Correct as at 16th April 2024. It may be superseded at any time.
Extract taken from: Vehicle Inspection Portal > VIRMs > Border inspection of imported used vehicles > Reference materials
Reference materials
1 Guidelines for the detection of reportable damage on imported used vehicles (excl motorcycles)
Vehicles imported from Australia Every vehicle imported from Australia will need to have a Personal Property Securities Register (PPSR) certificate downloaded from https://transact.ppsr.gov.au/ppsr/SearchForMotorVehicle?v=Search If the certificate identifies the vehicle as 'written off' it must be reported as damaged and a copy of the PPSR certificate uploaded into the Border Inspection system. |
1 Introduction
This guide is designed to provide foundation material to assist vehicle inspectors in the requirements for inspecting imported used motor vehicles; and the identification, recording, and flagging of structural damage.
The use of diagrams and photographs is used to support the written standards listed in the guide and illustrates:
- structural areas of unibody and body-over-frame vehicles
- energy management paths
- examples of the types of structural damage that needs to be reported.
| Note: Refer to Reference material 10 for guidance on the inspection of motorcycles. |
Vehicle fitted with ITS Connect
A vehicle must be reported if there is evidence that the ITS Connect system is fitted to the vehicle. The damage flag is to remain on the vehicle even if the ITS Connect system is disabled in Japan.
Note: Refer to Technical bulletins 3 Vehicles fitted with ITS Connect
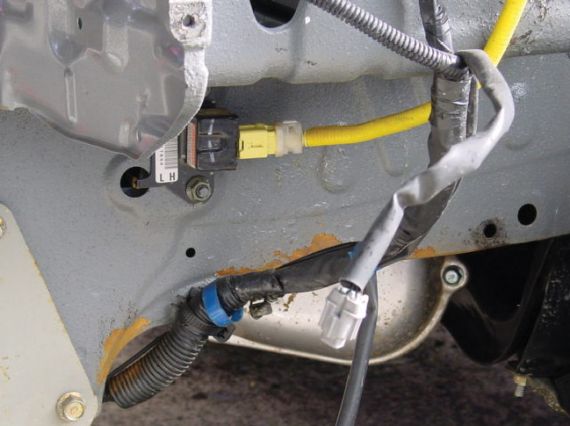
Option - (excluding MD1, MD2 minibus)Vehicle not fitted with Electronic Stability ControlA vehicle must be reported if there is evidence that an electronic stability control (ESC) system is NOT fitted to the used motor vehicle of class MA, MB, MC, or NA. This provision will not apply to a vehicle manufactured, or first registered outside of New Zealand, 20 years or more at the time of the border inspection. Notes
|
2 Purpose
The purpose of the guide is to provide vehicle inspectors with reference material stipulating the standards for reportable structural damage, supporting information, and to assist in the decision-making process when an imported used vehicle must be reported to Waka Kotahi (or ‘flagged’).
Exclusions to flagging of structural parts, ie those that do not require reporting are described and explained.
This guide also gives examples of ‘minor’ damage, which would be considered as cosmetic, and do not require reporting to Waka Kotahi.
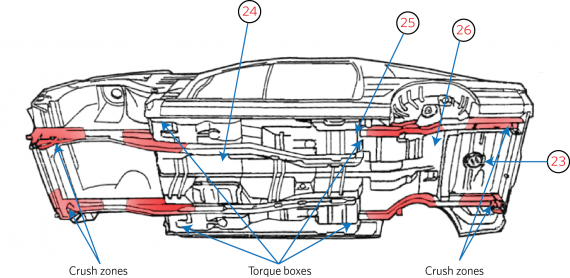
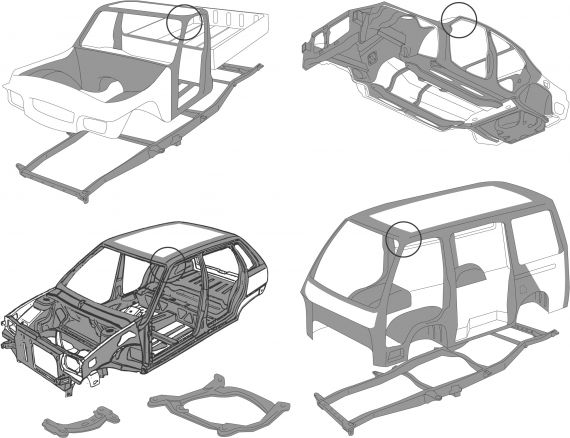
3 Overview – Structural parts: Unibody chassis

| 1 Inner guard | 8 Cant rail | 15 Rear seat floor | 22 Front bumper |
| 2 Upper chassis rail (reinforcer) | 9 Roof (not shown) | 16 B pillar | 23 Spare wheel well |
| 3 Strut tower | 10 C pillar (upper) | 17 Floor | 24 Tunnel (longitudinal) |
| 4 A pillar (upper) | 11 Rear panel | 18 Sill (rocker panel) | 25 Rear seat cross beam |
| 5 Windscreen header | 12 Rear ¼ panel | 19 A pillar (lower) | 26 Rear suspension cross beam |
| 6 Roof stiffener | 13 Boot floor | 20 Bulkhead | |
| 7 Parcel tray | 14 Rear seat back | 21 Lower (engine) chassis rail |
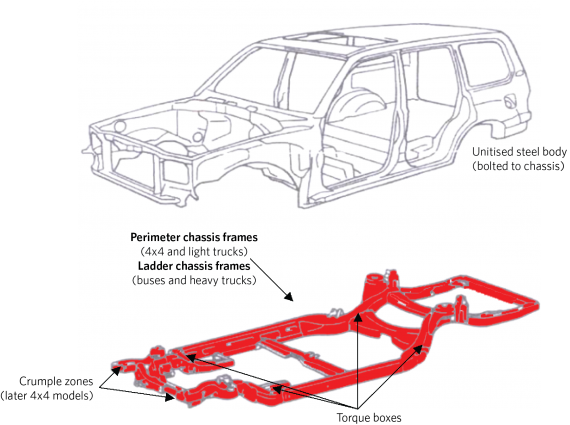
4 Overview – Structural parts: Body-over-frame chassis
5 Overview – Energy management path
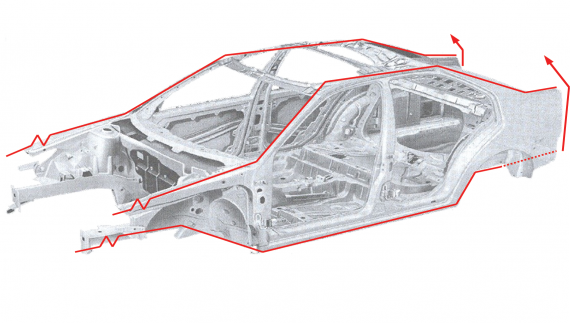
The structural integrity of the passenger safety cell is a key feature of motor-vehicle design.
- Front and rear structural parts are designed to absorb or manage collision energy by collapsing in pre-determined areas called crush zones.
- Crush zones are built into the front and rear of the vehicle in the form of holes, slots, dimples, convolutions, or hydro-formed tailored blanks.
- Bonnets are designed to buckle and avoid windscreen penetration, and also minimise pedestrian injury.
- The unibody structure is designed to route collision energy around the passengers; with the passenger safety cell the last area to deform in a crash where collision energy exceeds the design.
6 Criteria for reporting structural damage or corrosion
The following information gives guidance to vehicle inspectors in determining whether or not a light vehicle (including motorcycles where applicable) undergoing border inspection requires reporting.
Applicable legislation
Vehicles to which this section applies must be inspected by a vehicle inspector or inspecting organisation appointed under 2.2(1)(k) in accordance with requirements and conditions imposed by Waka Kotahi under 2.3.
The criteria detailed below must be used when deciding if any damage or corrosion should be reported. All damage meeting this criteria and found in the energy management path areas must be reported.
The important distinction when applying these criteria is:
- Whether the area identified as damaged by impact, previous repair, or corrosion is structural or cosmetic, and
- Whether the extent of damage is sufficient to compromise the structural integrity of the motor vehicle, or
- Whether evidence of damage, previous damage repair, or heat damage is present in a structural area, or energy management path of the motor vehicle.
Photographs illustrating examples of structural damage and corrosion are shown in Reference material 5.
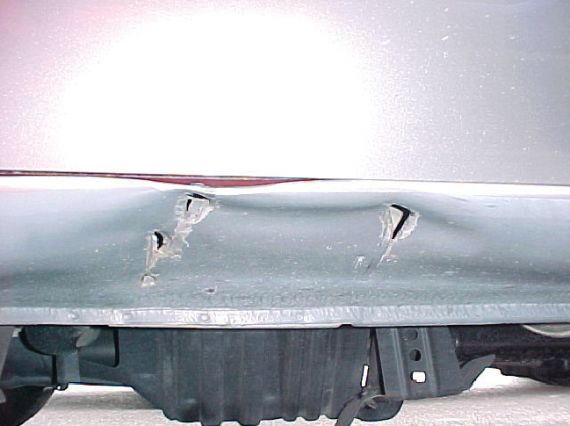
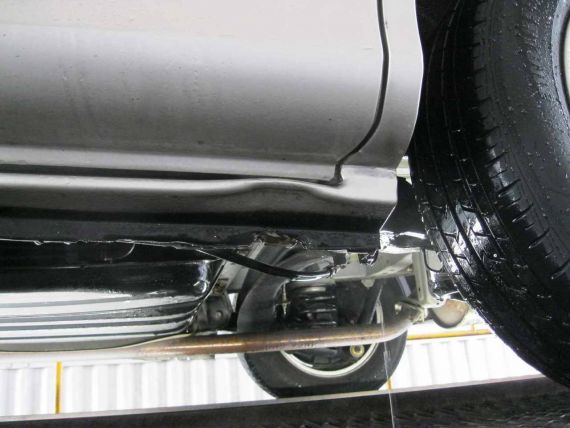
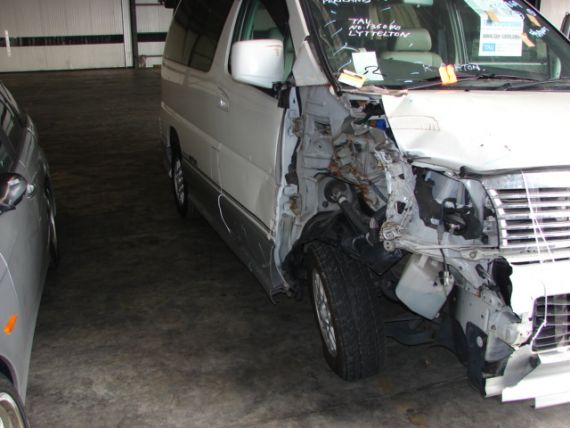
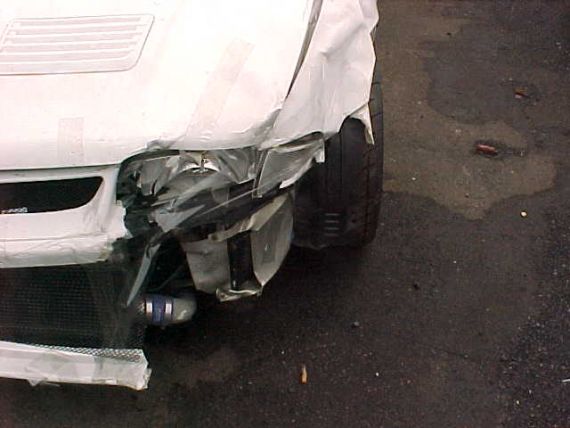
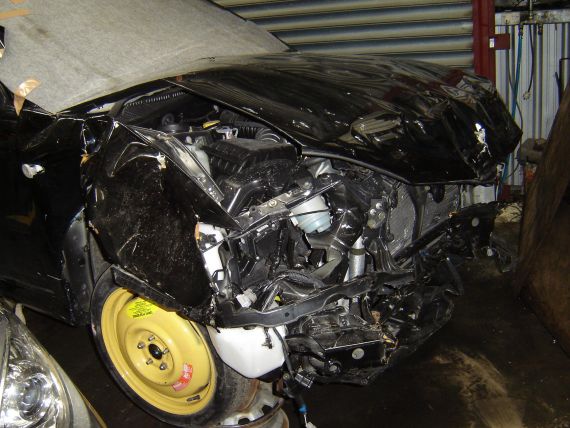
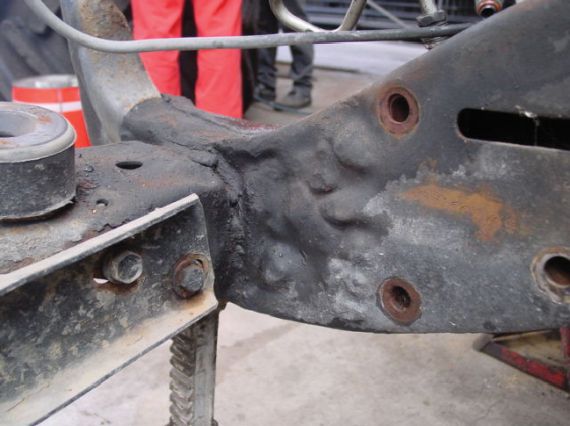
Under-body impact damage
A vehicle must be reported if it has underbody damage as a result of a collision with a substantial object, sufficient to cause the splitting of seam welds, distortion of suspension members or mounting points, or tearing of metal structures, excluding floorpan stiffeners (Note 1).
Note 1
When distinguishing between floorpan stiffening members and cross-members, note that a member that runs through the line of a seat or occupant area will not be an energy absorbing member (ie its purpose is to reinforce the floorpan), while a member that runs alongside a seat or occupant area should be treated as an energy absorbing member (ie a chassis rail).
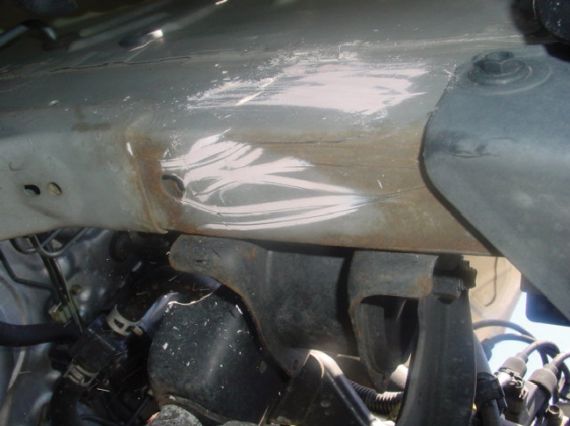
Denting or distortion
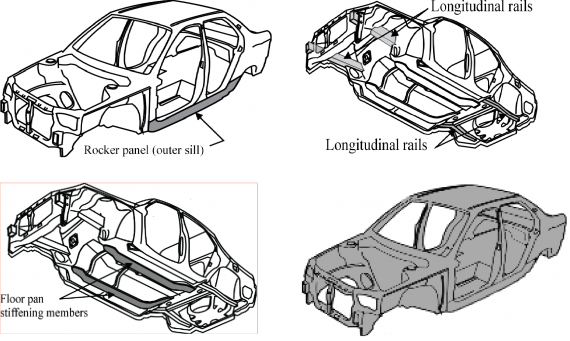
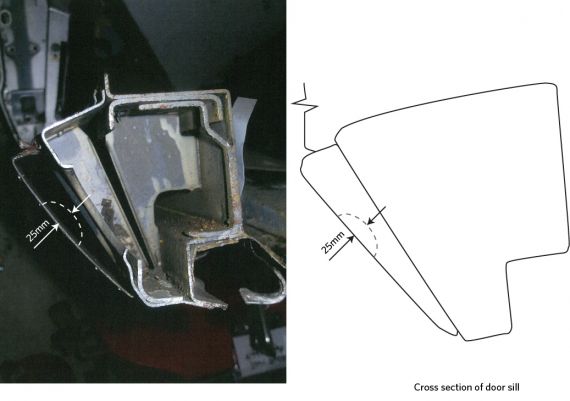
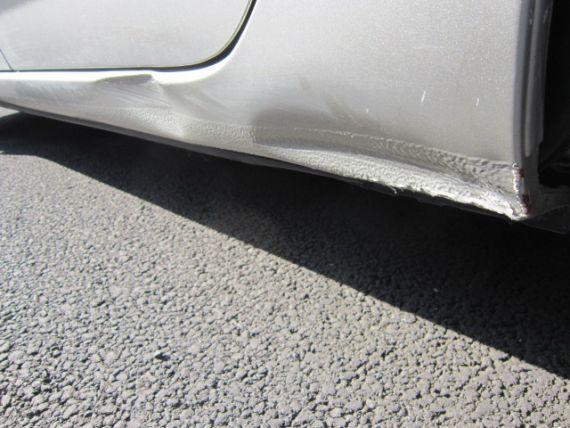
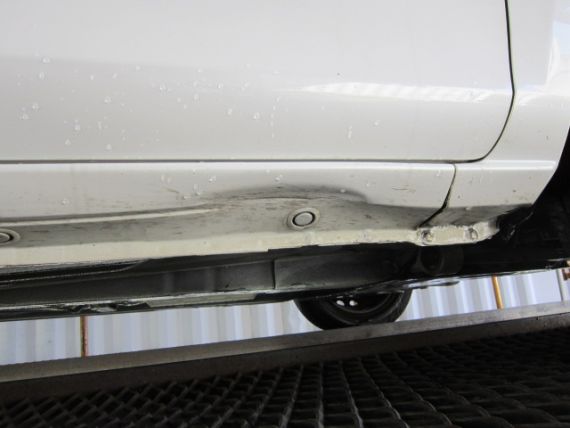
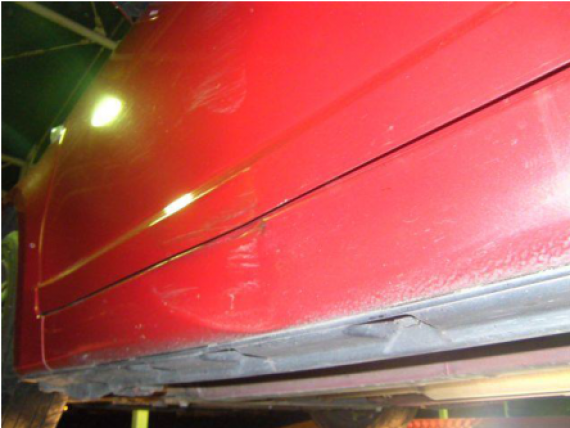
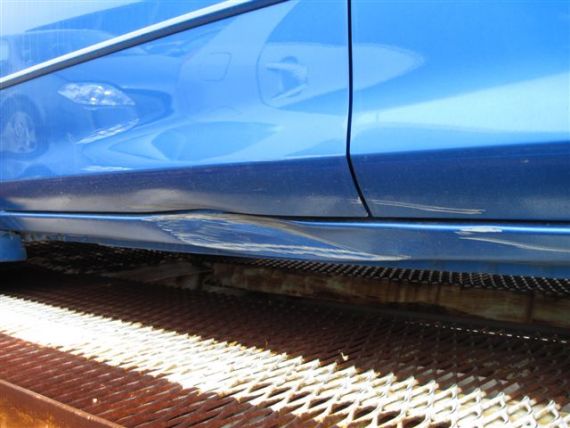
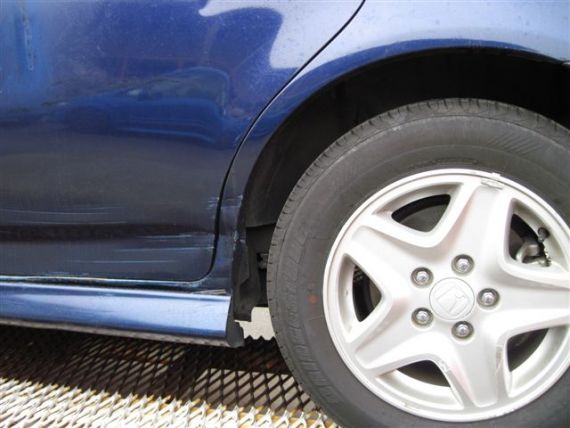
- A vehicle must be reported if there is any discernible denting or distortion to the folds or swages in the dog leg, sill panel or structure of the inner/outer sill weld seam, other than minor scraping.
- A vehicle must be reported if rocker panels (outer sills) are dented or creased lengthways along the sill and the depth of the crease exceeds 25mm.
- A vehicle must be reported if rocker panels (outer sills) are vertically dented or creased across the sill regardless of the depth of the crease or dent.
Outer sills cross section and rocker panels
Crush zones and kick-up areas
A vehicle must be reported if there is distortion of the longitudinal rails affecting the front and rear crush zones and kick-up areas.
Crossmembers
A vehicle must be reported if there is denting or distortion of the crossmember as a result of collision with an object.
Cracking
A vehicle must be reported if there is cracking in:
- the unibody chassis
- any crossmembers and subframes
- a load bearing member, or energy management paths in unibody structures
- the body of a vehicle with a body-over-frame chassis in the energy management paths, engine mounts, suspension mounts, body mounts, pillars, or sills.
Repaired damage
A vehicle must be reported if signs of fresh repair, rust prevention, acid wash (see Technical bulletin 4: Acid wash process on used imports) or under-sealing to any part of the vehicle structure are evident.
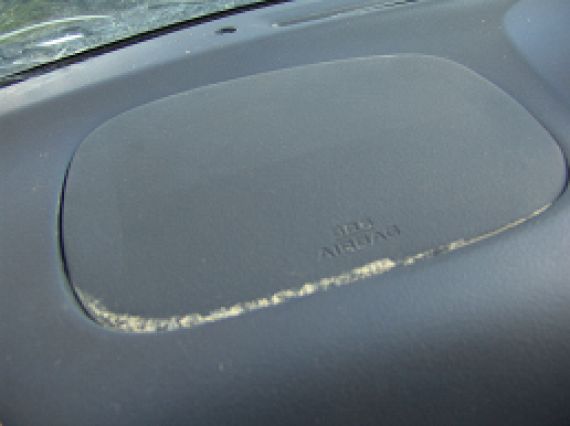
Supplementary Restraint System (SRS): Airbags and seatbelt pretensioners
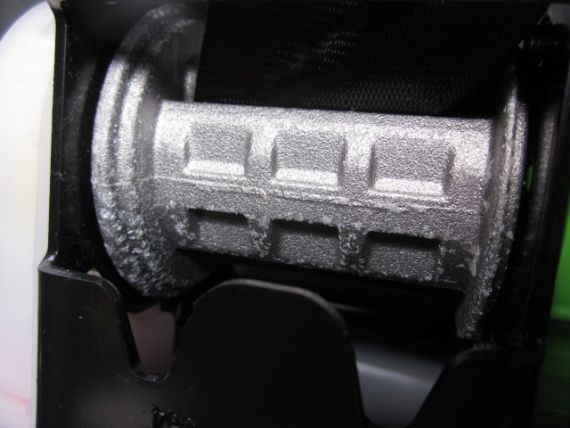
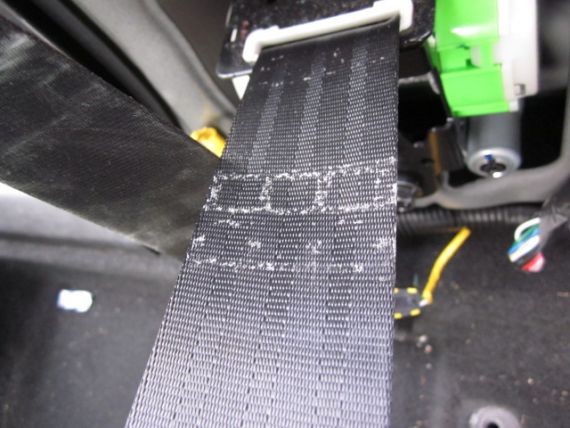
A vehicle must be reported if it has a deployed airbag or seatbelt pretensioner, or there is evidence of repairs to or tampering with airbag module covers. (including colour variations in plastic covers to steering wheels, dash panels, interior trim, or non-original stitching to seat mounted airbags). A vehicle must be reported if the SRS warning light stays illuminated when the engine is running.
Water damage, fire damage or other written off vehicles
A vehicle must be reported if there is evidence that it has suffered water damage, fire damage or the veicle has been written off (Note 2).
Note 2
For the purposes of the border inspection, evidence of water or fire damage may be physical evidence, or it may be that the vehicle has been written-off for insurance purposes as a result of water, fire >or other damage.
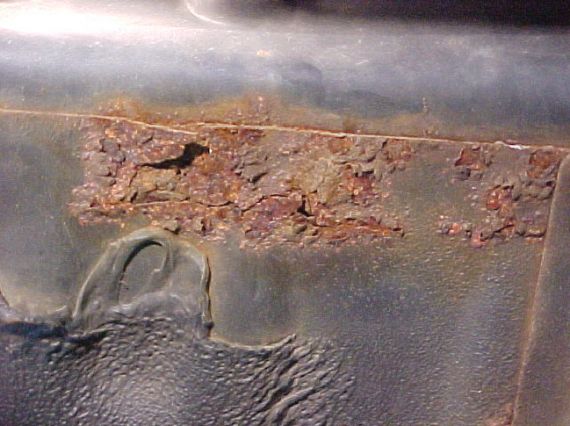
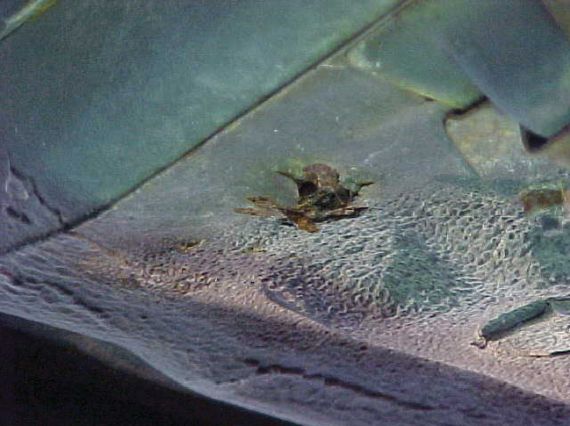
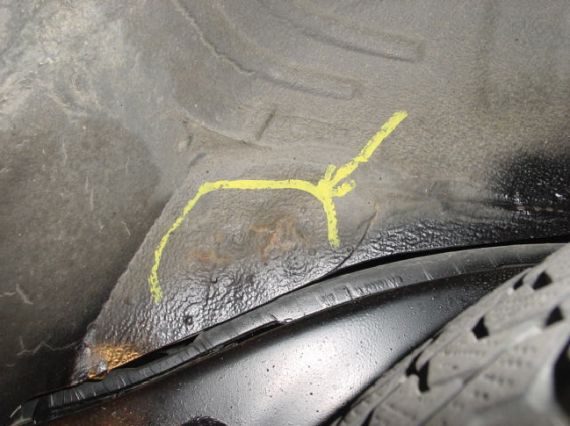
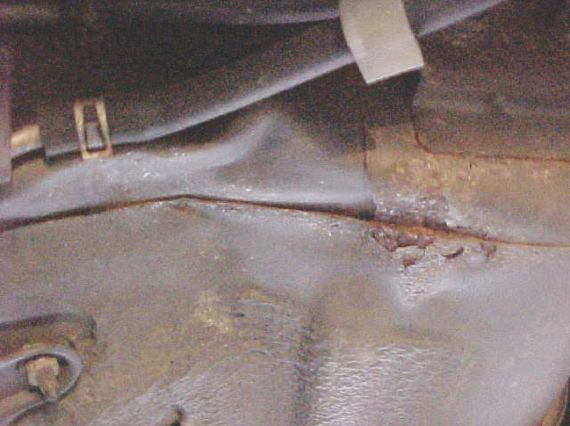
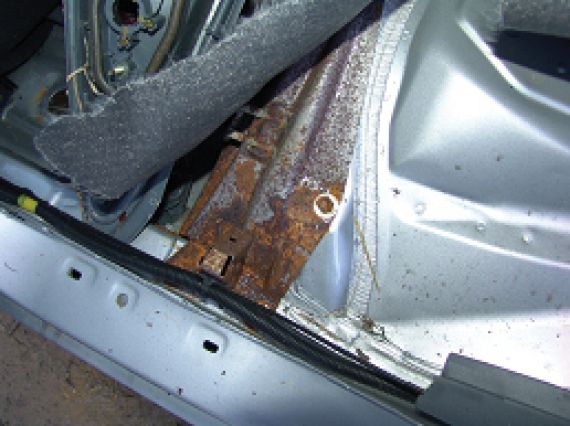
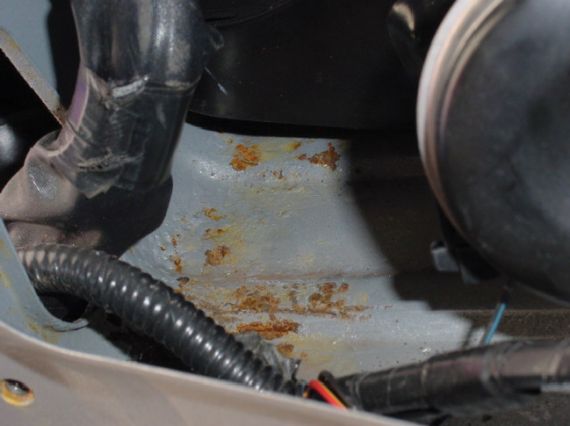
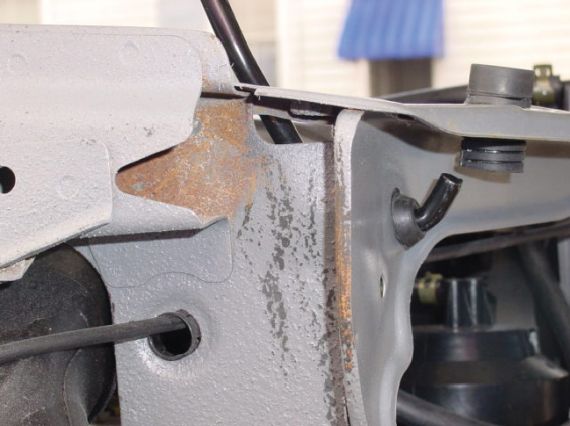
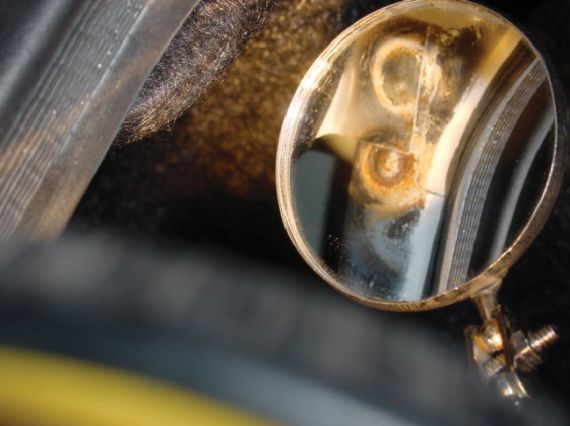
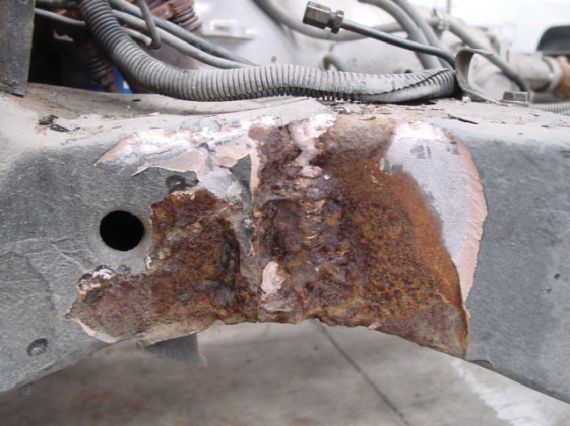
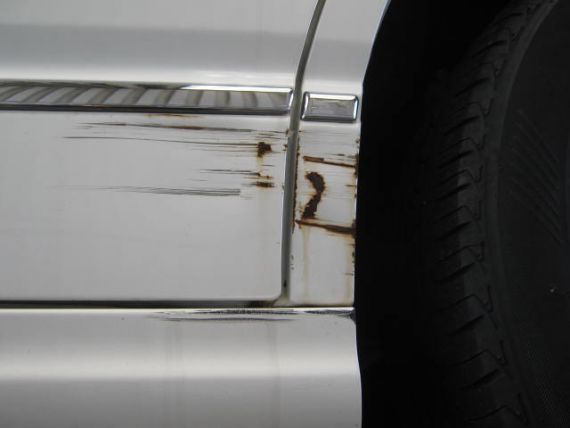
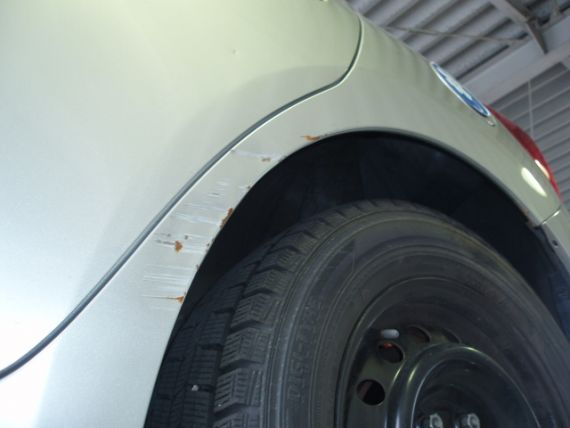
Corrosion Damage
- Corrosion damage is where the metal has been eaten away, which is evident by pitting. The outward signs of such corrosion damage are typically displayed by the swelling of a panel between spot welds, or lifting or bubbling of paint. In extreme cases, the area affected by the corrosion damage will fall out and leave a hole.
A vehicle must be reported if there is corrosion damage in any structural area, as indicated in the shaded areas of Figure 1-1-1.
Note 4
For the purposes of the border inspection, corrosion damage includes any signs of ‘rust bleed’. Rust bleed is a rust coloured stain or mark that appears around an area of corrosion that may not be visible. Rust bleed is most commonly found where panels join or overlap when corrosion has started between the two surfaces and moisture has caused a rust stain or mark to run onto the external surface.
- Perforated corrosion is where the metal is corroded to the extent that it has holes, or holes are exposed when rust scale is removed. If metal is badly pitted causing a loss of metal thickness it must also be treated as perforated corrosion.
If there is perforated corrosion in any other (non-structural) area, as indicated in the non-shaded areas of Figure 1-1-1, the vehicle requires to be reported.
Figure 1-1-1. Structural corrosion damage limits
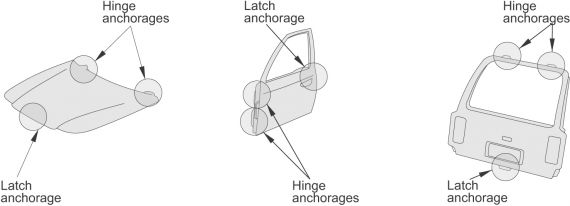
Corrosion, or the repair of corrosion on ‘bolt on’ parts (doors, bonnets, and boot lids)
within a 150mmcircle around the outside of hinge or latch components will require to
be reported. These ‘no corrosion’ zones are circled in Figure 1-1-2.
Figure 1-1-2. Hinge and latch anchorage corrosion damage limits
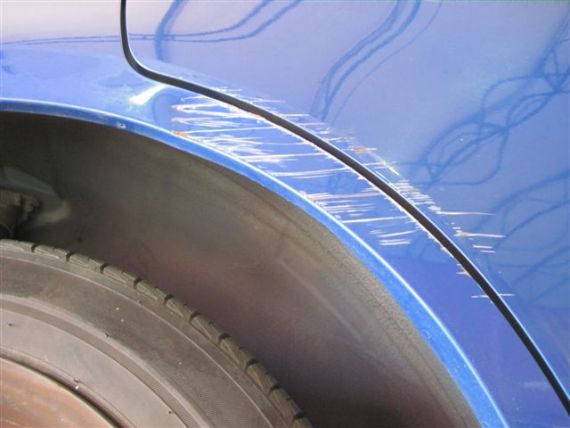
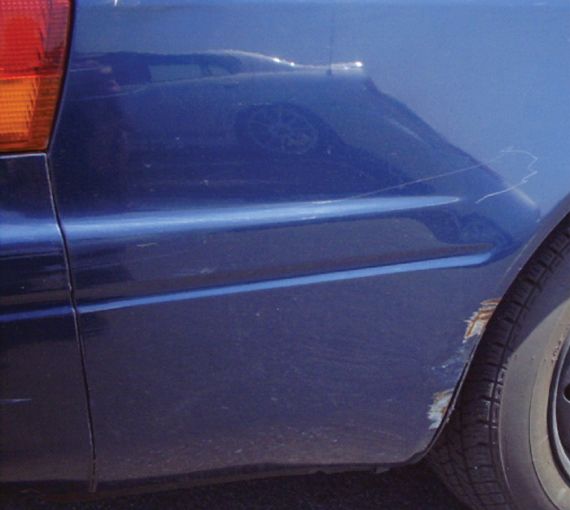
7 Cosmetic damage
Cosmetic damage to the motor vehicle’s outer body panels is permitted, providing it does not affect the structural integrity of chassis, the energy management paths, or any of the bonded or welded seams or joints as a result of the manufacturing process.
Cosmetic parts on a unibody chassis are generally bolt on items such as the front guard, boot-lid, and in most cases the doors.
Photographs illustrating examples of cosmetic damage are shown in Reference material 6.
Inspection
A list of specific types of damage follows. It explains the extent to which damage is allowed before a vehicle must be reported.
Underbody impact damage
- A vehicle does not require reporting if it has minor underbody impact damage as a result of ‘grounding’ the vehicle or some scraping of the sill seams.
- A vehicle does not require reporting if there is crushing or tearing of floorpan stiffening members (Note 5), provided it does not affect any internal cross-members designed for side-impact protection.
Note 5
When distinguishing between floorpan stiffening members and cross-members, note that a member that runs through the line of a seat or occupant area will not be an energy absorbing member (ie its purpose is to reinforce the floorpan), while a member that runs alongside a seat or occupant area should be treated as an energy absorbing member (ie a chassis rail).
Denting or distortion
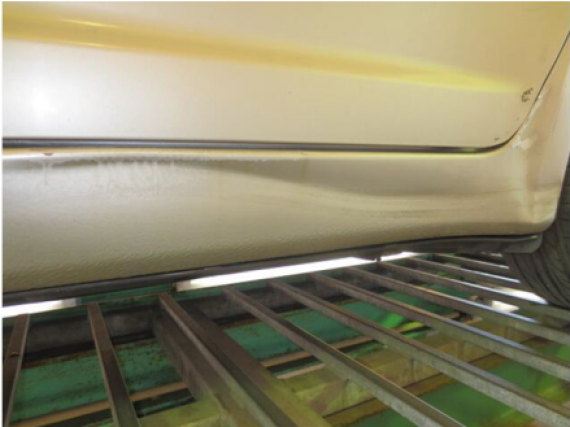
A vehicle does not require reporting if rocker panels (outer sills) are dented or creased lengthways along the sill to a depth of less than 25mm.
Cross-members
A vehicle does not require reporting if it has minor jacking damage to a cross-member, provided there is no indication of loss of steering or suspension alignment.
Repaired damage
A vehicle with repaired damage does not require reporting if repairs are only to correct cosmetic damage to the outer body panels, provided the vehicle inspector is able to discern the extent of the damage and confirm that none of the vehicle manufacturer’s seams or joints have been disturbed during the repair.
Entry vehicles with known corrosion problems
Mitsubishi
Diamante:Floor/front strut towers
Legnum: Under body/Strut towers
Lancer Evo: Rear rails
Delica van: Front rails
Nissan
Safari: Floor/front and rear cross members/radiator support panels
Terrano: Floor area
Mistral: Floor area
Pulsar: Under body and inner floor/sill joint
Mazda
Demio: Front cross member
MPV: Rear chassis rail
8 Ancillary Procedures
Doubt regarding damage status
If after completing the check on the vehicle there is any doubt whether to report the damage found, the following approach should be applied.
IF IN DOUBT DO NOT REPORT THE DAMAGE
Exceptions to flagging of structural parts
The front windscreen and all other glass is a structural part in the Unibody chassis, and modern (light) Body-over-frame chassis. For the purpose of entry-level inspection, the glass is not to be flagged as a damaged structural item, unless the cause of the windscreen damage can be attributed to airbag deployment or other structural damage that must also be flagged.
Page amended 1 October 2023 (see amendment details)
2 Border inspection system guidelines
2-1 System guidelines overview
Border inspection system
The purpose of the border inspection system is to record the data collected by service providers when border inspections are performed on used vehicles intended to be imported into New Zealand.
Entering border inspection records
Border inspection records can be entered individually through a user interface, or stored in a batch file and uploaded to the system via the border inspection system homepage.
A border inspection record must be entered within 48 hours of the inspection being carried out for vehicles inspected in New Zealand and within five days after the ship has departed for vehicles inspected offshore.
Access to methods of entering records
Access to both methods of entering a record is via the homepage of the border inspection system website.
Duplicate records will not be accepted.
Note: To increase the font size in the system, select and hold Control (Ctrl) whilst simultaneously rolling the scroll wheel on your mouse.
Logging into the system
Refer to the Accessing and logging into the system section for instructions on how to access the NZTA online services and log in to the border inspection system.
Border inspection system homepage

Attachments
Border inspection records may include attachments; attachments may be a combination of images and one water damage report. Refer to the Attachments section for further information about attachments and their specifications.
Contact details
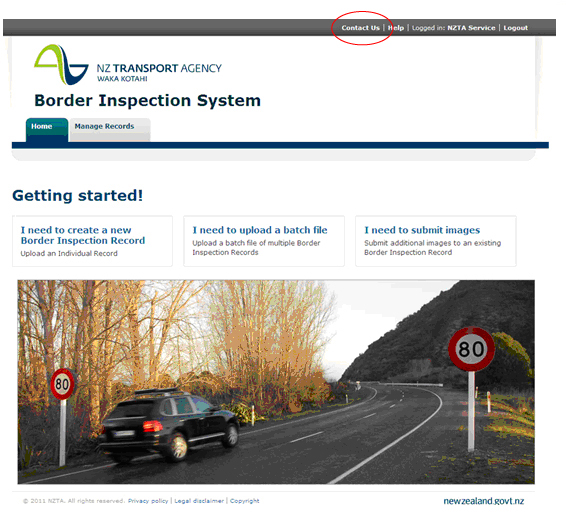
To access NZTA contact details, hover your mouse over Contact Us at the top right-hand side of the screen. The message will refer you to the VIRM, page 2-1 for the relevant NZTA contact details.
2-2 Accessing and logging into the system
Logging into the border inspection system
| Step | Action |
|---|---|
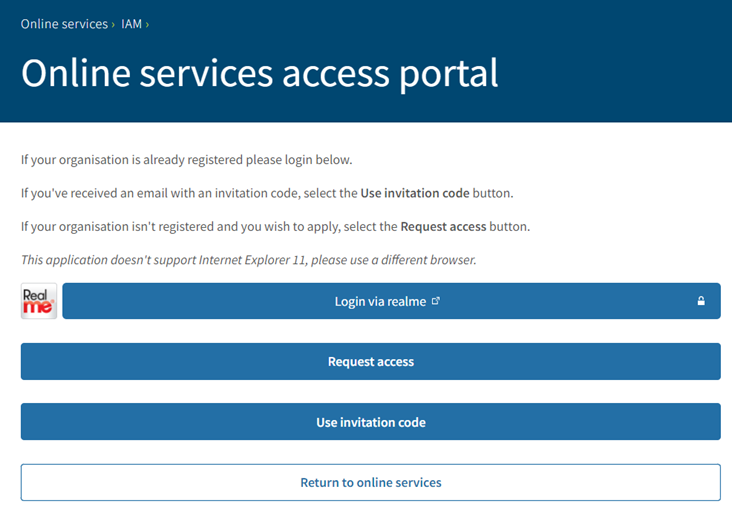
| 1 | Open a new browser window and enter the following URL: https://accessportal.nzta.govt.nz/ Please note: the portal does not support Internet Explorer, please use a different browser, |
| 2 | This will provide access to the Waka Kotahi online services access point:
|
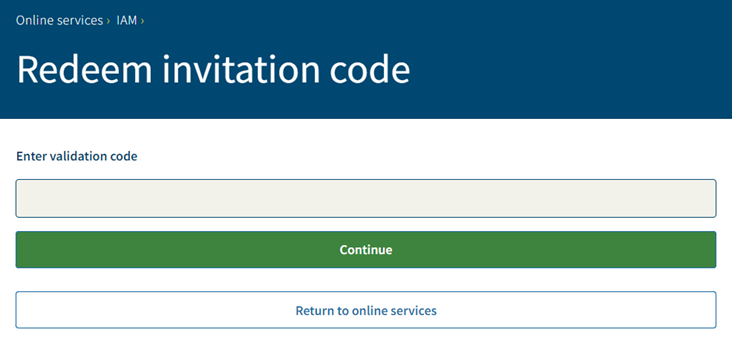
| 3a | To access the system for the first time you must accept an invitation. Select the Use invitation code button. This will take you to the Redeem invitation code screen. Enter invitation code and select Continue.
You will be directed to the Realme login page – go to step 4. Note: You only need to accept an invitation once, to register to the portal. For all subsequent logins go to step 3b. |
| 3b | To login, select Login via realme. |
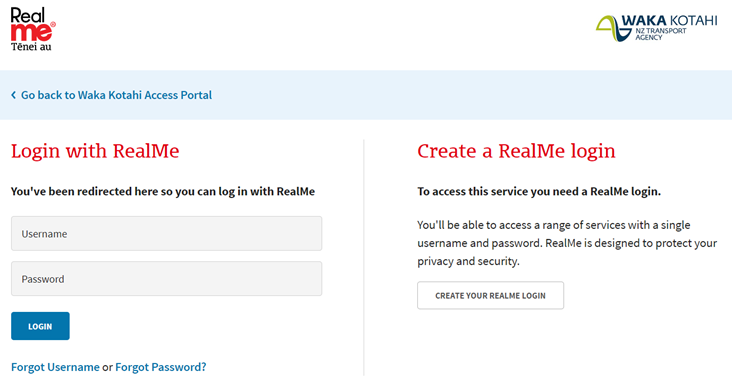
| 4 | You will be directed to the Realme login page. Enter your realme login.
|
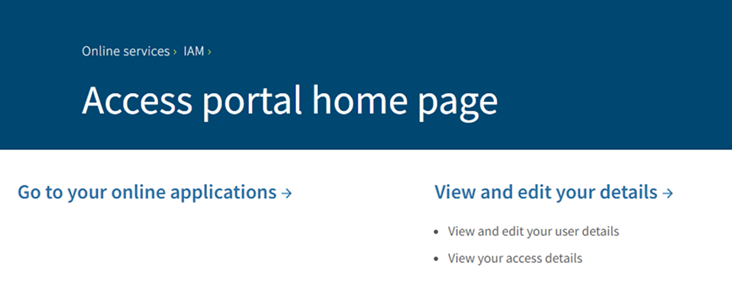
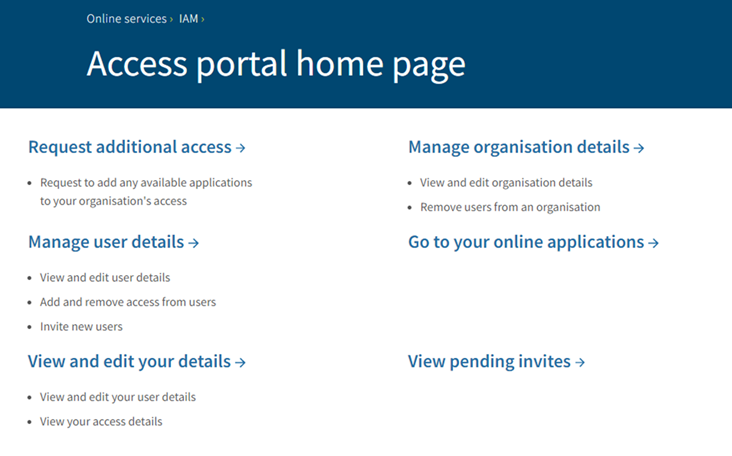
| 5 | Successful login will direct you to the Access portal home page. Your home page will be either the General user home page or the Organisation administrator home page. General user home page
Organisation administrator home page
|
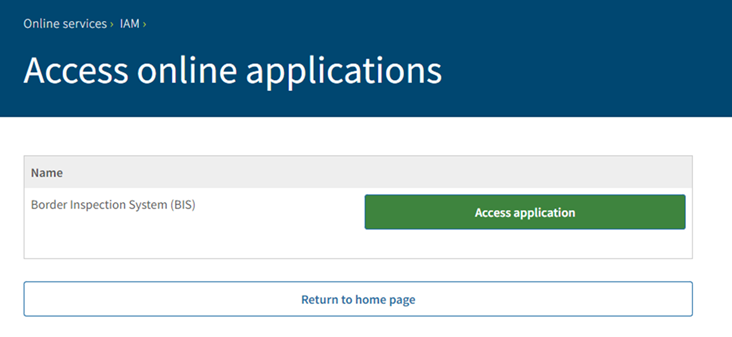
| 6 | Select Go to your online applications. |
| 7 | This will take you to the Access online applications screen.
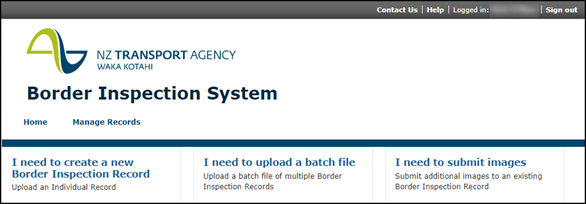
Select the green Access application button next to Border inspection system (BIS). |
| 8 | You will be directed to the Border inspection system home page.
|
| 9 | Unsuccessful login screen.
|
Page amended 8 November 2022 (see amendment details)
2-3 Border Inspection System administration and corrections information
The following information is to assist Border Inspection Organisations (BIOs) new to the Border Inspection System (BIS). It provides quick administrative answers to some frequently asked questions.
BIS system
A batch file is accepted into BIS excluding any errored records. Errored record should be corrected and sent in a new batch file.
- The same batch file will not be accepted twice, and the system does not accept duplicate records.
Occasionally you may have a second border inspection for the same vehicle or another vehicle using the same chassis number. For authority to load the record using an alternative chassis field, email borderchecks@nzta.govt.nz providing the error message and the border inspection details for review. An alternative solution may be provided.
If copying and pasting data into a record, please ensure low value characters (usually @ * ^ ~) are not included.
There are two uploads from BIS to LANDATA each day.
- Records received prior to 1:00am (NZ time) are uploaded to LANDATA at 6:00am (NZ time).
- Records received prior to 1:00pm (NZ time) are uploaded to LANDATA at 2:00pm (NZ time).
Photos
Four photos can be loaded with the border inspection record. An additional four can be added to an existing record. If there are photos, keep them with your records as we can ask if they’re needed.
For more information see 2-8 Adding additional images to an existing record
Updated NZTABusinessDataTypes.xsd files are emailed when the Motor Vehicle Register (MVR)/LANDATA system tables have been updated. These files are provided to ensure that the information you load will be accepted into BIS and will also load into LANDATA. For example, a border inspection record loaded into BIS using an invalid make will load into BIS but not LANDATA. For example, Mercedes-Benz is correct but M/Benz and Mercedes Benz are invalid.
Included in the file are:
- ISO list of three-character country codes
- list of Ports
- list of border inspection sites
- makes
Correcting errors to border inspection records
Inspection dates, importer names, ship names, or port of arrival
Send a copy of the border inspection checksheet to borderchecks@nzta.govt.nz and we will update the LANDATA record.
VIN/chassis number recorded incorrectly
Advise the incorrect number to your customer.
Your customer (or the importer/owner) should provide the incorrect VIN or chassis number to a New Zealand entry certification agent. The entry certifier will verify the correct VIN or chassis number physically on the vehicle. If it’s a chassis number, the agent can correct it. If it’s a factory VIN and both the incorrect and correct VINs are valid in LANDATA the entry certification agent will contact Waka Kotahi NZ to fix.
Make and/or Model
This will be corrected by the entry certifier. They will inspect the vehicle and ensure the vehicle attributes that have been loaded into LANDATA are correct.
Damage flag set in error
Send an explanation to borderchecks@nzta.govt.nz and if appropriate we will remove the damage flag in LANDATA.
Damage flag not set
Send the damage notes and photos to borderchecks@nzta.govt.nz. The damage flag and damage note will be added to the LANDATA record. The photos (up to eight) will be added to the BIS record. If there are numerous records requiring correction, an alternate process may be given.
Incorrect Odometer reading
Email a photo of the odometer reading taken during border inspection and/or a copy of any paper-based documentation that shows the actual odometer reading recorded by the inspector to borderchecks@nzta.govt.nz
If your documentation shows the recorded odometer reading and the customer (or the importer/owner) believes the odometer reading it’s incorrect, they or their NZ entry certification agent should email the following to frr@nzta.govt.nz for consideration:
- A copy of the entry certification checksheet, and
- Other official inspection documents (shipping and auction/sales documents are not appropriate) showing the odometer reading in the previous country of registration, or
- Documentation from a recognised NZ odometer specialist certifying that the odometer has not been tampered with and it’s considered to correctly record the distance the vehicle has travelled at the time of inspection.
Where keying error can't be identified
Where a keying error cannot be verified, the public display of odometer records can be suppressed. This is discretionary and based on risk and supporting documentation. If the information provided is not deemed sufficient, we will not change the odometer reading leaving it publicly available to allow the public to come to their own decision as to the vehicle's correct mileage.
Any other questions concerning the Border Inspection System (BIS) and the Motor Vehicle Register System (LANDATA), please email borderchecks@nzta.govt.nz
Page added 1 October 2022 (see amendment details)
2-4 Entering an individual record
Creating a new record
| Step | Action |
|---|---|
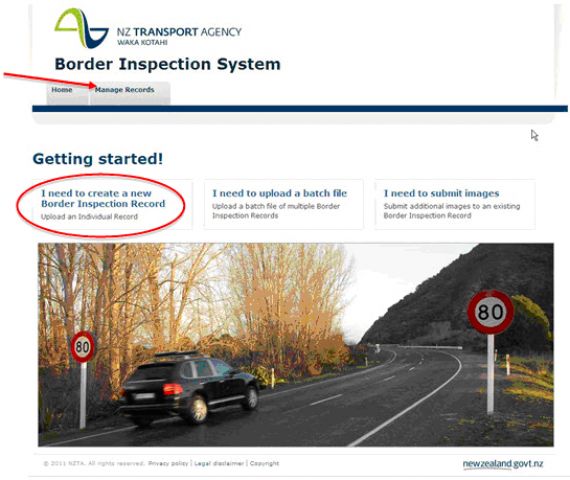
| 1 | On the homepage, create a new record by using one of the methods below:
|
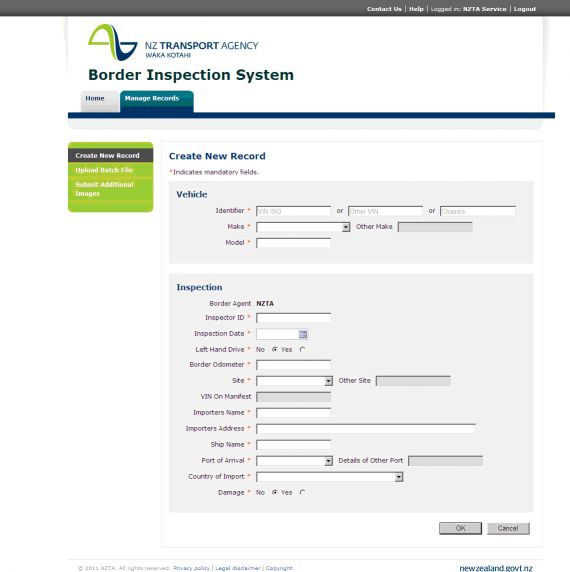
| 2 | A new window will open and display the following form:
|
| 3 | Complete the necessary fields. Note: Refer to the Completing the form section for additional information about entering details. |
| 4 | When all fields have been completed and all attachments (if necessary) have been added, to save the record, click on OK. |
2-5 Completing the form
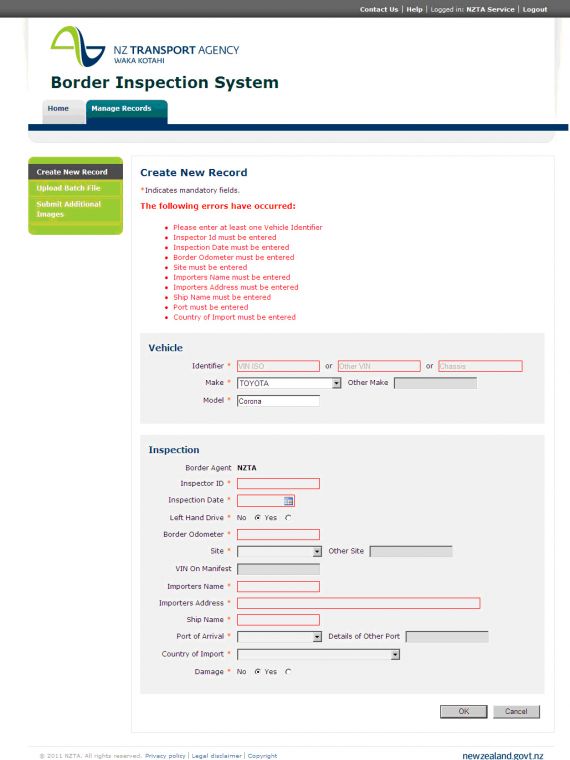
Standard mandatory fields
In the Create New Record screen, any field that is preceded by an * is a mandatory field and must be populated before the record is submitted.
The following fields are mandatory:
- Identifier
- Make: select from a drop-down list
- Model: free text
- Inspector ID: free text
- Inspection Date: select using the calendar picker
- Left Hand Drive: automatically defaults to ‘No’
- Border Odometer: must contain a value greater than, or equal to, zero
- Site: select from a drop-down list
- Importers Name: free text
- Importers Address: free text
- Ship Name: free text
- Port of Arrival: select from a drop-down list
- Country of Import: select from a drop-down list
- Damage: automatically defaults to ‘No’.
Additional notes for vehicle section
- Identifier: at least one identifier must be entered for a record. Either:
- VIN ISO, or
- Other VIN
Do not enter a vehicle identifier into the ‘Chassis’ field.
- Make: if you select Other in the Make drop-down list, enter the make details for the record in the Other Make box.
Note 1
VIN ISO:
- cannot include: ‘O’ for Oscar, ‘I’ for India or ‘Q’ for Quebec
- must be 17 characters in length
- must not have a dash (-) entered in the number.
Note 2
A Japanese domestic VIN will always have a dash (-) somewhere in the VIN.
Additional notes for inspection section
- Inspector ID: Use the person’s initials followed by a sequential number which identifies the inspector.
- Inspection date: the inspection date must be entered as yyyy/mm/dd. Select a date by using the date picker icon to the right of the Inspection Date box.
Note: The date cannot be in the future. - Border Odometer: border odometer readings must be values that are equal to or greater than zero. If no odometer reading can be recorded, enter ‘00000’
- Site: if you select Other in the Site drop-down list, enter the site details for the record in the Other Site box.
- Ship name: If you want to record the voyage number, use this field following the name of the ship, eg Transfuture 6 (VOY 48)
- Port of Arrival: if you select Other in the Port of Arrival drop-down list, enter the port details for the record in the Details of Other Port box.
- Country of import: this is the country that the vehicle was exported from.
- Damage: if the No button is selected, the Damage section will not appear and no further fields need to be completed. If the Yes button is selected, further fields related to damage will appear enabling notes, photos and/or water damage reports to be attached to the record. Refer to the Entering further information if the vehicle is damaged section for further details.
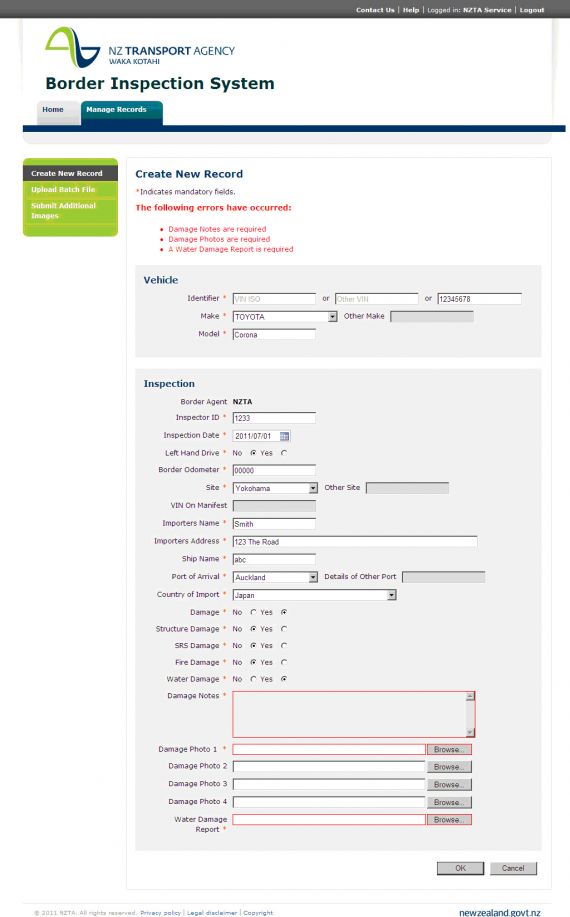
2-6 Entering further information if the vehicle is damaged
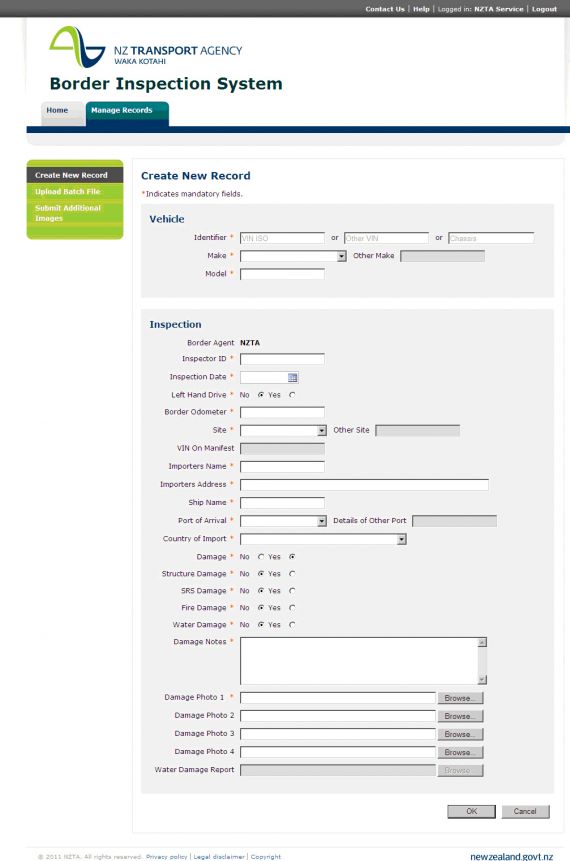
Create new record screen with additional damage fields
Mandatory fields for damage information
If the vehicle has been damaged, the following fields are mandatory:
- Damage
- Structure Damage
- SRS Damage
- Fire Damage
- Water Damage
- Damage Notes
- Damage Photo 1.
Additional notes for the damage fields
- Damage: if you select the Yes button, you must supply at least one photo with the record showing the damage to the vehicle. Refer to Damage Photo 1 bullet point below.
- Damage notes: when entering damage notes, select from the following list to describe the type of damage and where the damage is on the vehicle.
Damage Rust |
External Underbody Internal |
Front Rear Side |
Left Right |
Note: When a modified vehicle is flagged, record in the notes "suspect modification to the vehicle".
- Water Damage: if you select the Yes button, you must supply a water damage report with the record. Refer to Water Damage Report bullet point below.
- Damage Photo 1: click on Browse… to locate the photos to be attached.
Note: Photo pixels must not exceed 640 x 480 pixels. Minimum of two photos must be attached.
- Water Damage Report: click on Browse… to locate the file to be attached
- Refer to the Attachmentssection for detailed specifications for photographs and reports.
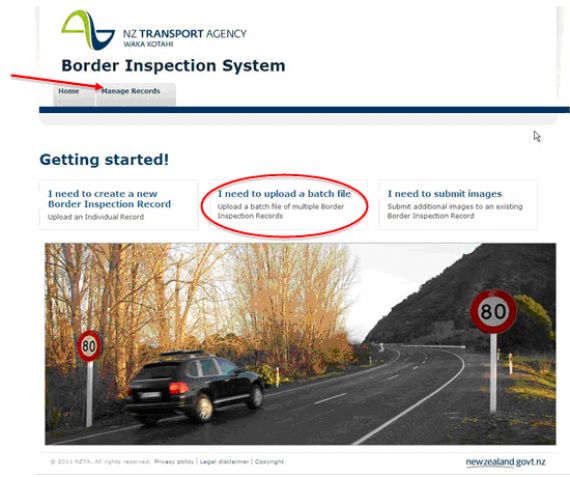
2-7 Entering multiple border inspection records (batch files)
Introduction
Multiple border inspection records can be loaded in an .xml file and submitted for upload to the border inspection system.
Uploading a batch file
| Step | Action |
|---|---|
| 1 | On the homepage, upload a batch file by using one of the methods below:
|
| 2 | A new window will open requesting that you select a file to upload:
|
| 3 | Click on Browse… to locate the batch file stored on your system. |
| 4 | After you have selected the relevant file, click on OK. |
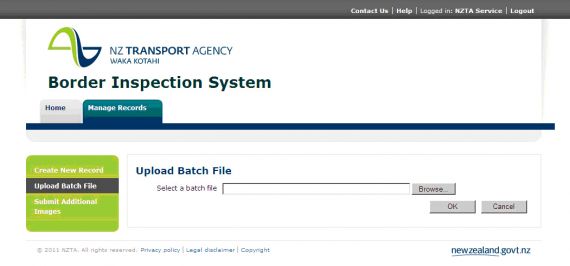
Batch file specifications
- The file must be supplied in an xml format that meets the NZ Transport Agency (NZTA) border inspection schema. For a copy of the schema, refer to the technical specifications that were supplied with your NZTA contract.
- Images and jpegs are to be incorporated as part of the inspection record and included in the xml file
- The following fields must be populated in upper case:
» UnknownMake (eg KAMAKUSA)
» ImporterName (eg FAST CARS INC)
- The following fields must be populated in title case:
» UnknownPort (eg Whanganui, not whanganui or WHANGANUI)
» UnknownSite (eg Pokeno, not pokeno or POKENO).
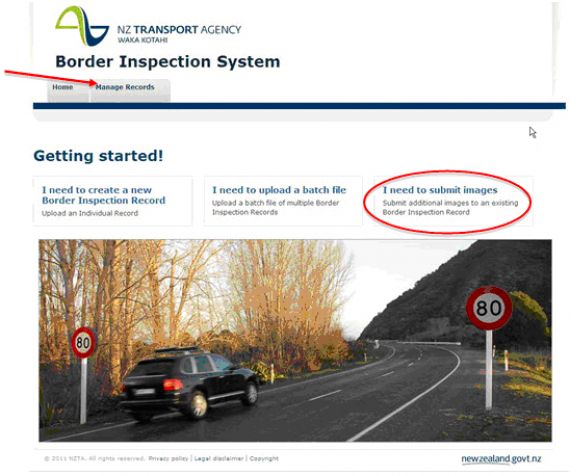
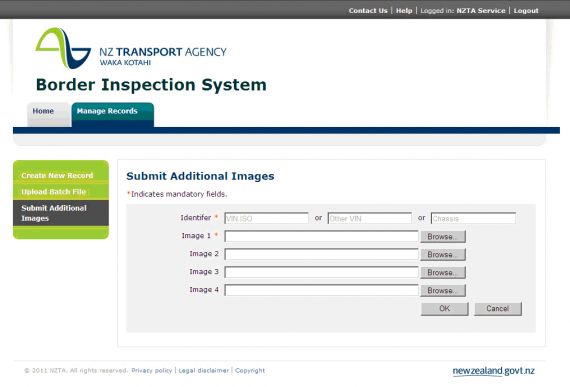
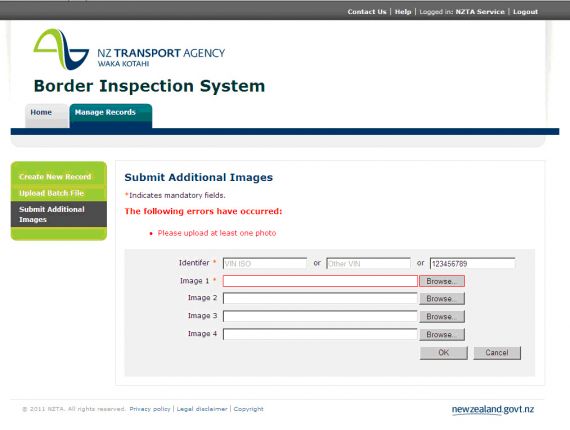
2-8 Adding additional images to an existing record
7 Adding additional images to an existing record
Overview
- An additional four images may be added to an existing border inspection record
- Additional images must be located, selected and then submitted for inclusion with an existing inspection record
- Additional images can only be uploaded to one inspection record at a time.
Adding additional images
| Step | Action |
|---|---|
| 1 | On the homepage, add additional images by using one of the methods below:
|
| 2 | A new window will open that provides browser capability to enable additional images to be selected:
|
| 3 | Enter the Identifier associated to the existing inspection record that you wish to add the images to. This will be either:
Note: VIN ISO cannot include: ‘O’ for Oscar, ‘I’ for India or ‘Q’ for Quebec, and must be 17 characters in length. |
| 4 | Next to Image 1, click on Browse… to locate the image to be uploaded. Refer to the Attachments section for attachment specifications. |
| 5 | Once selected, the name of the image for uploading will be displayed in the Image 1 box. |
| 6 | Use the Image 2, 3 and 4 boxes to upload more images, if necessary, clicking on Browse… beside each box to locate the images to be uploaded. |
| 7 | After you have uploaded all necessary images, click on OK. |
2-9 Attachments
8 Attachments
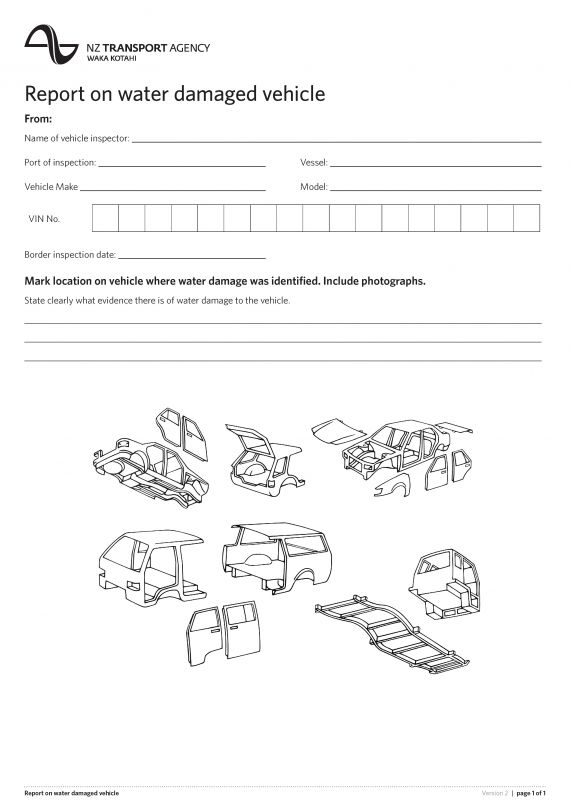
Water damage report
When a record indicates that the vehicle has water damage, a water damage report must be included. This is stored as a jpeg file and submitted with the initial record:
- only one water damage report is permitted for inclusion with a record
- a water damage report cannot be submitted as an additional attachment after the initial record has been entered into the system.
See Reference material 4 for a copy of the water damage report form.
Technical specifications – water damage report
A water damage report jpeg must be a minimum size of 200kb and cannot exceed 400kb.
Photos
When a record indicates that the vehicle has damage, it must have at least one photo attached when the initial record is submitted:
- up to four images can be loaded with the initial record and another four images can be loaded separately for the record after the initial submission.
Technical specifications – photos
All photos supplied with records must meet the following specifications. Each image must:
- be formatted as a JPEG
- 640 x 480 pixels in size
- RGB, 24 bits per pixel
- Minimum DPI of 72, maximum of 180.
2-10 Example error messages (screenshots)
9 Example error messages (screenshots)
Error messages
When insufficient or incorrect information is entered by the user, an error message will display.
The message appears at the top of the page in red font and fields that require populating are also highlighted in red.
Example 1: Create new record
Example 2: Create new record
Example 3: Submit additional images
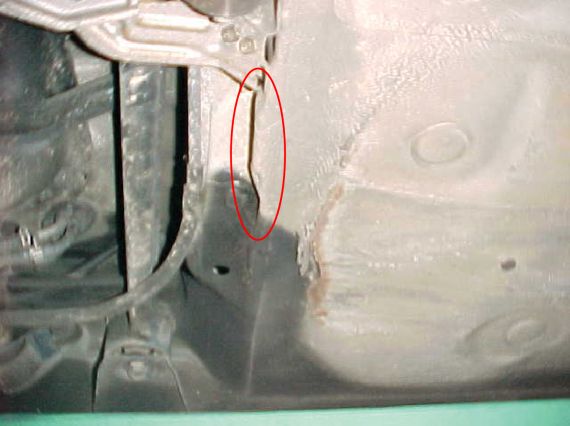
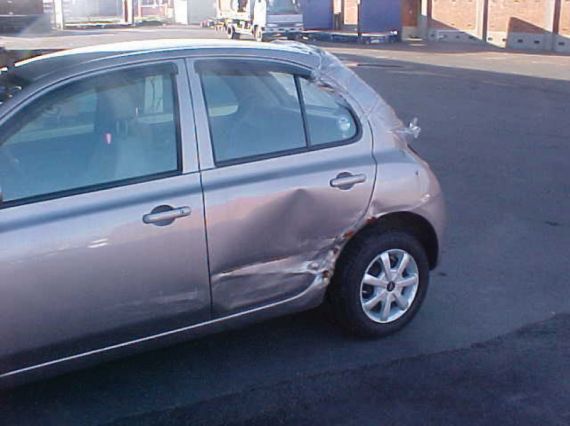
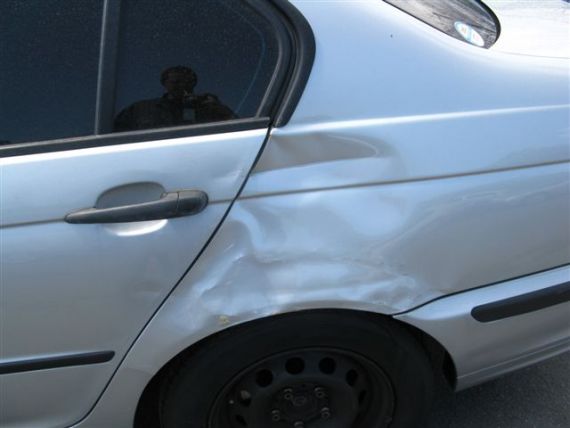
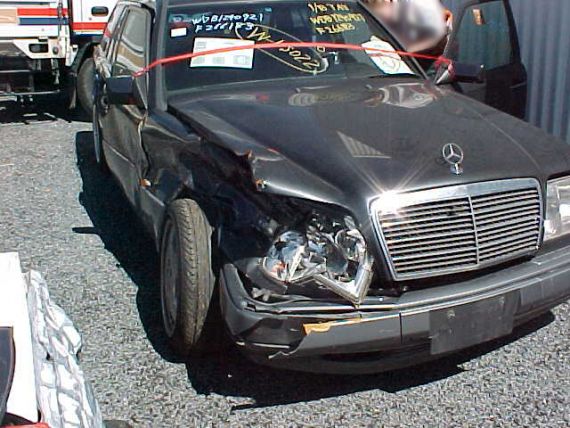
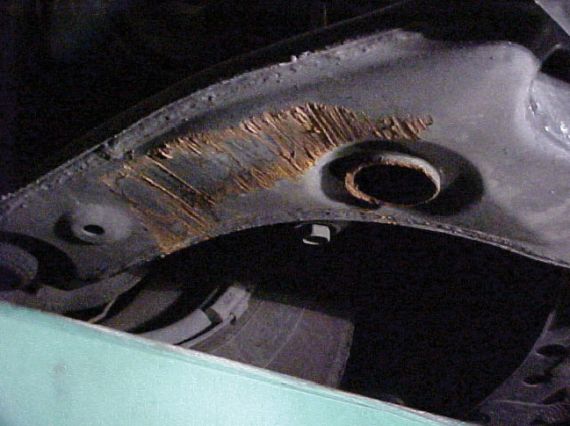
5 Examples of major structural damage and corrosion
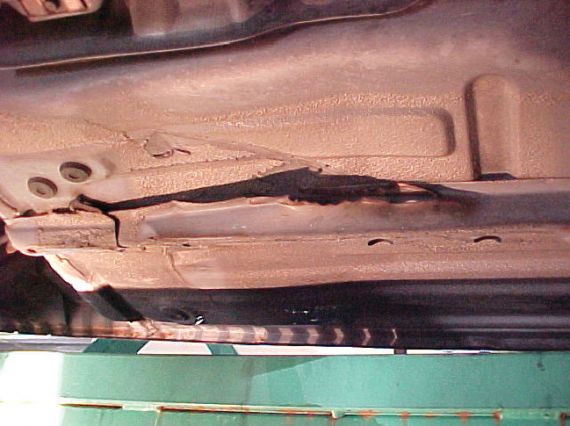
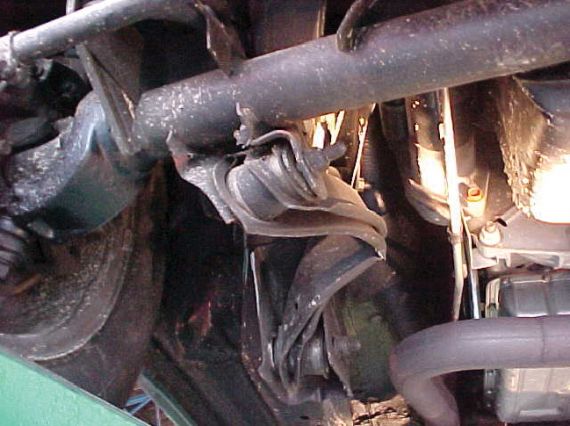
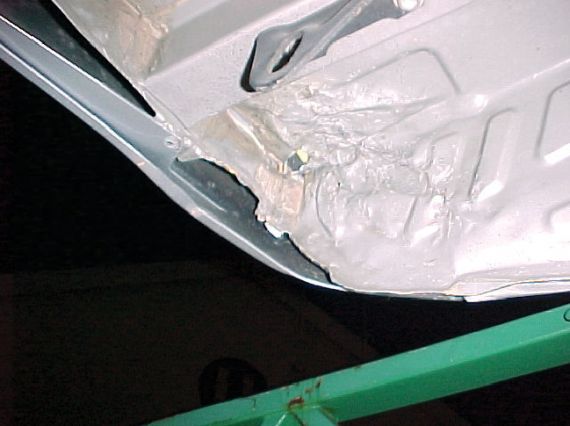
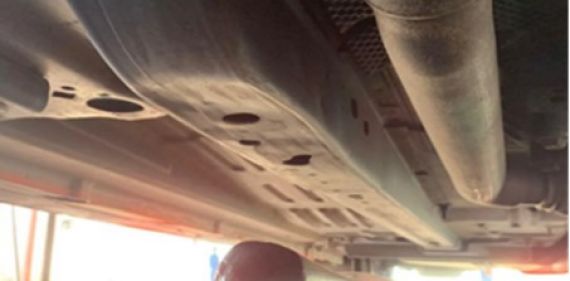
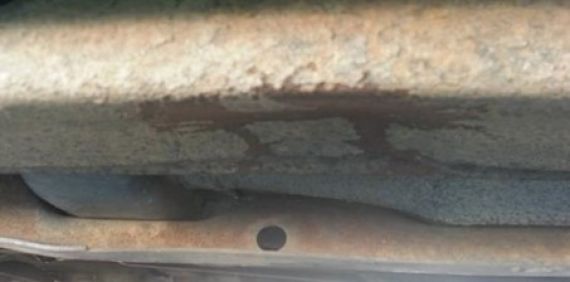
5-1 Under-body damage: Crushing of floor pan stiffening members
The damage in these images must be referred to a repair certifier to determine whether the damage is structural or non-structural.
Where it's determined that the damage is non-structural, and there's no other damage requiring an LT308, the repair certifier will issue an LT307.
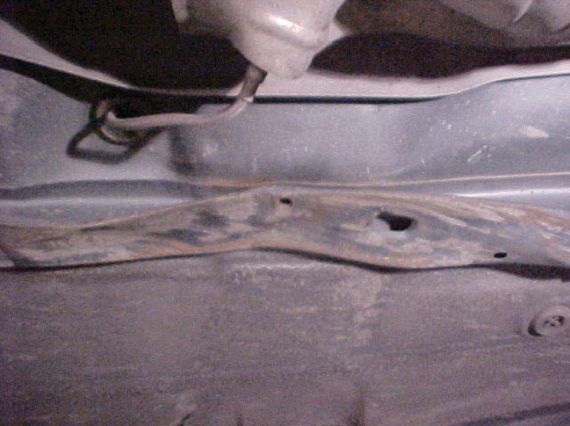
Page amended 21 February 2024 (see amendment details)
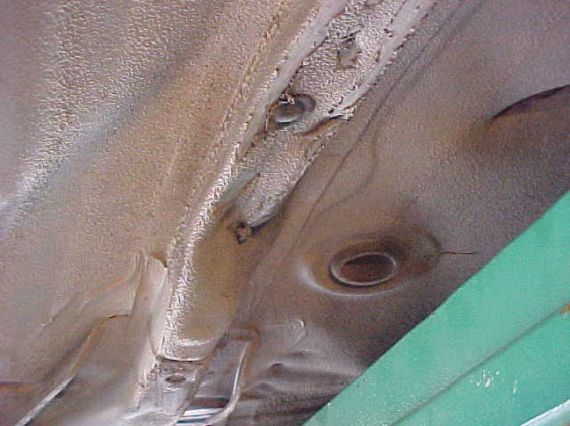
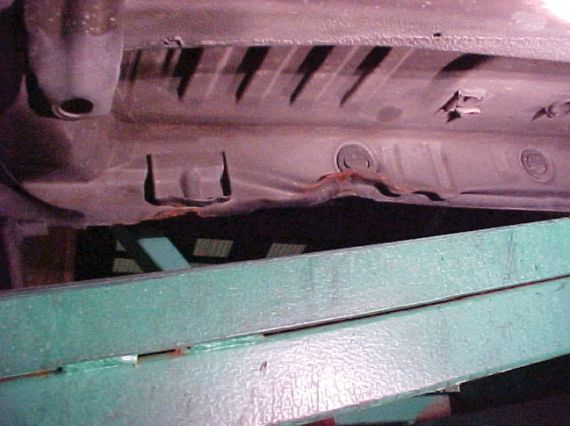
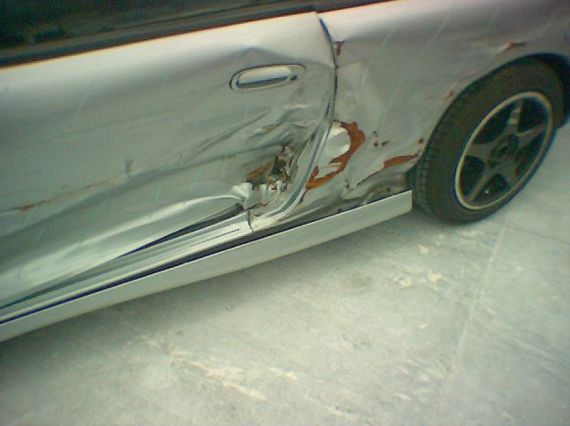
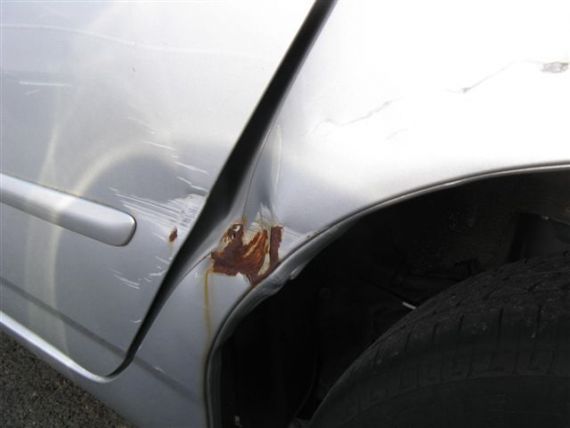
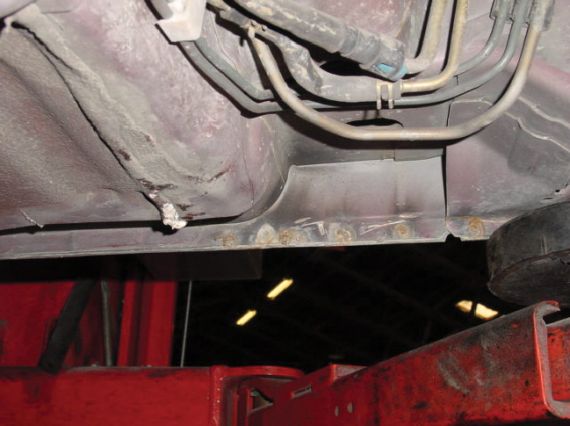
5-2 Under body damage: Splitting of seam wells
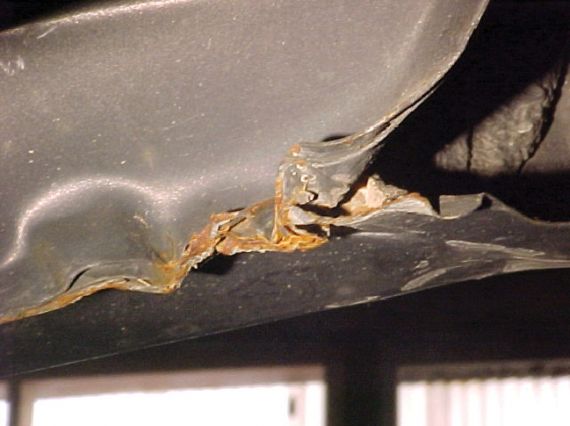
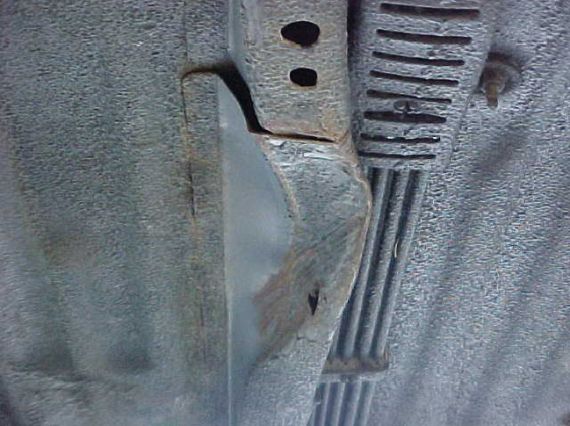
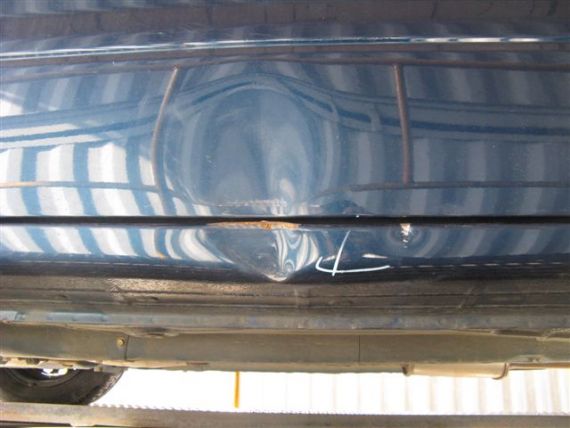
5-3 Under body damage: Tearing of the metal
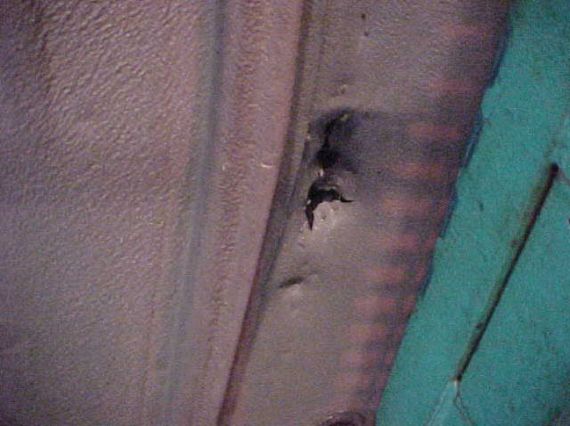
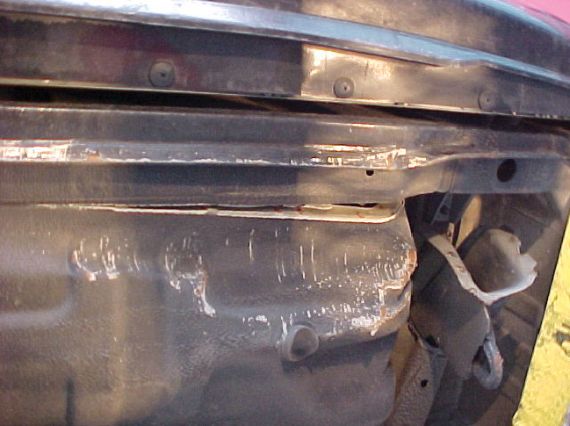
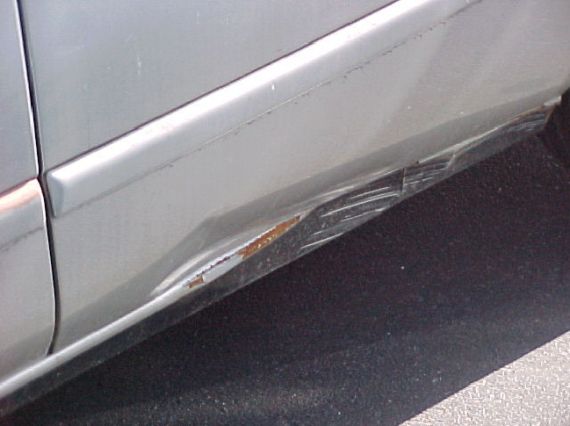
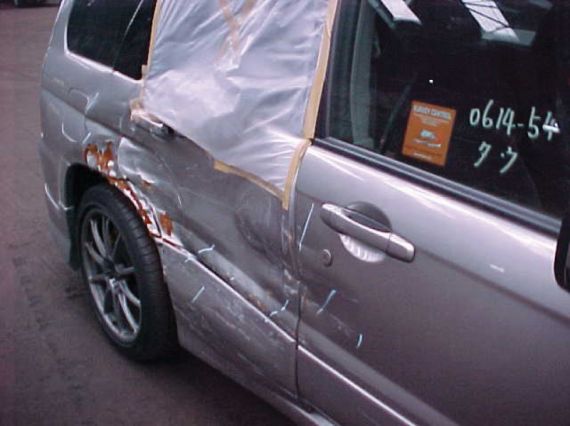
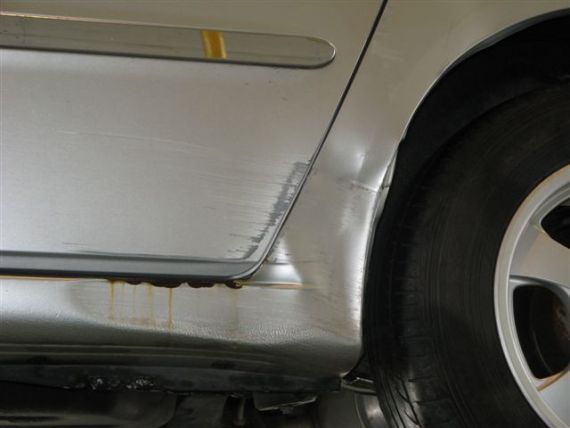
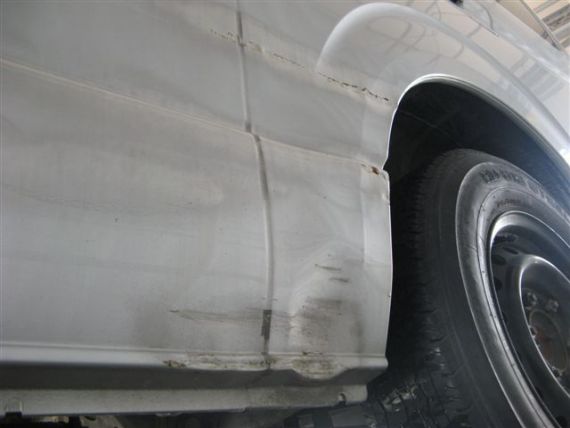
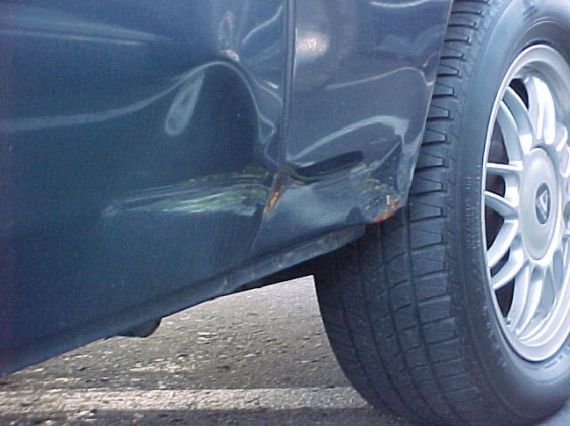
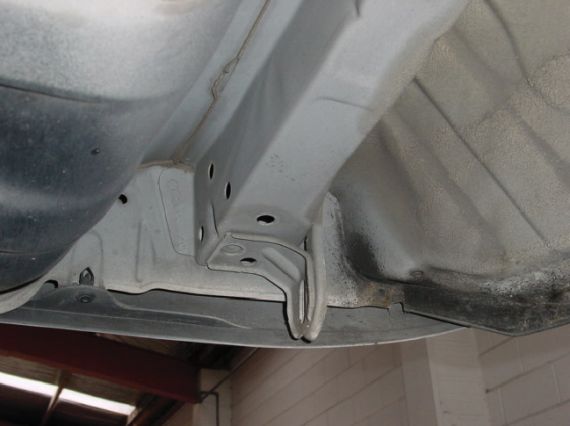
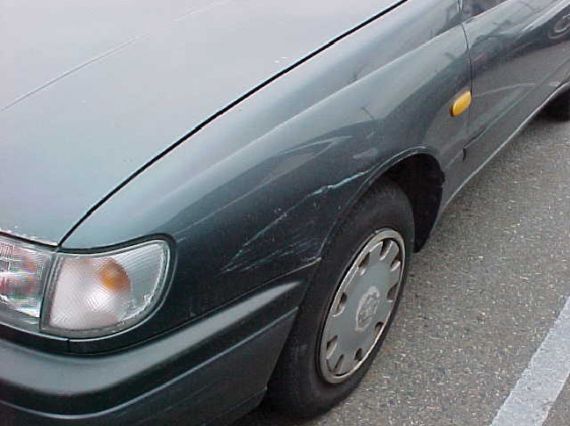
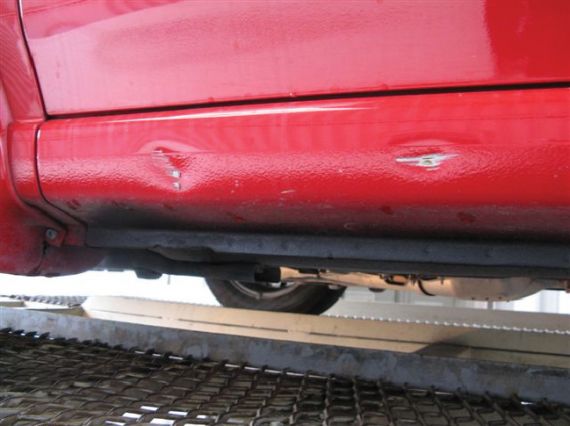
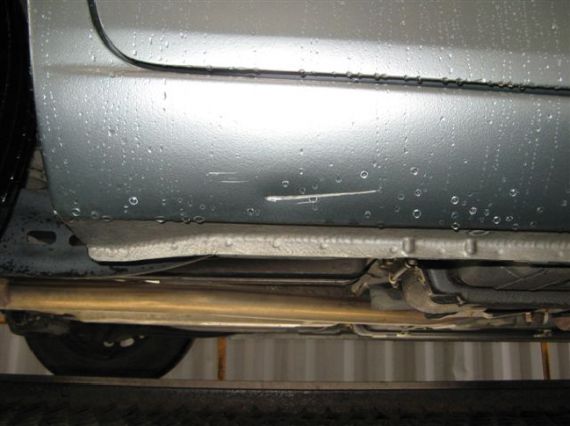
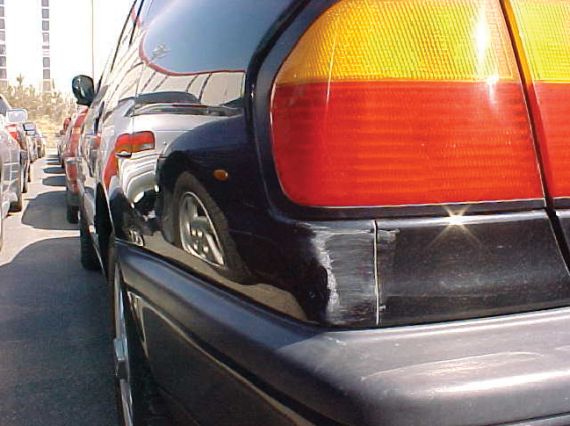
5-4 Damage to rocker panels and cant rails
Rocker panels
Cant rails
Page amended 1 October 2023 (see amendment details).
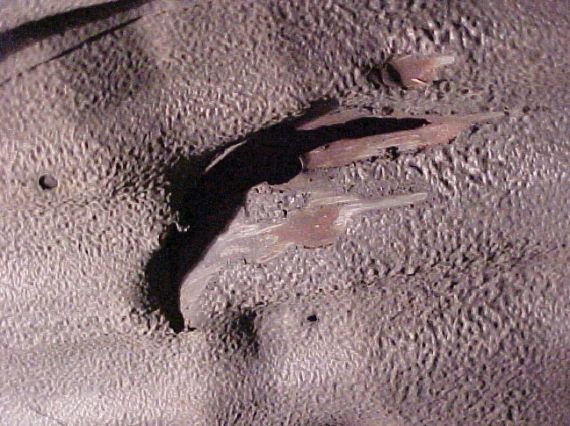
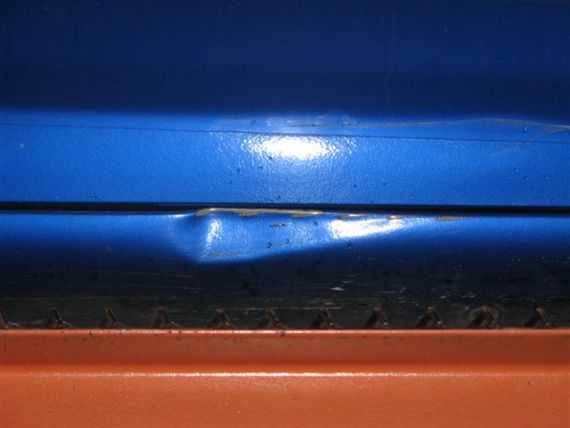
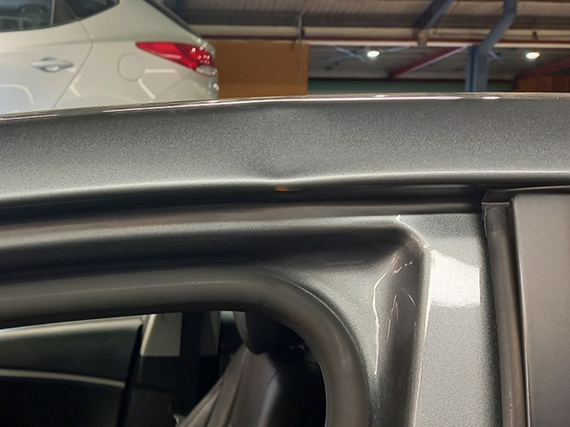
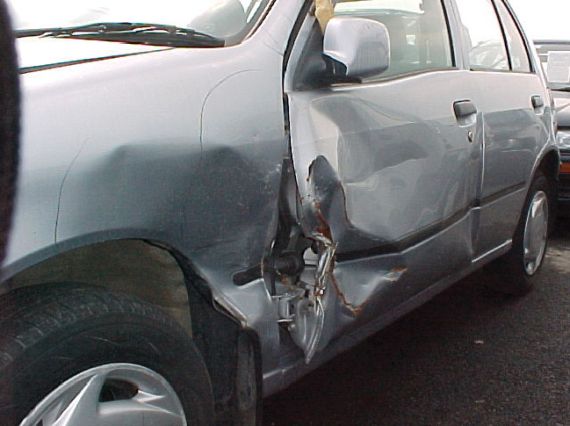
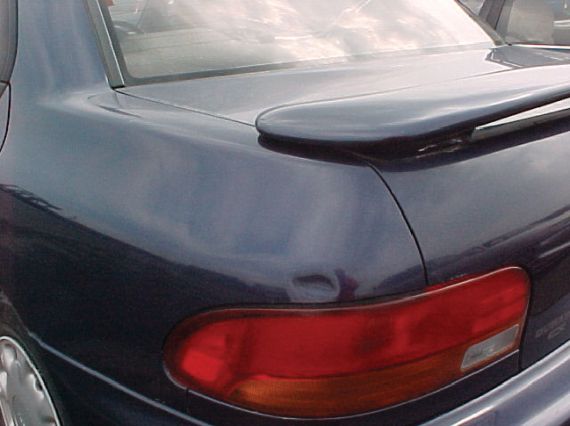
5-5 Rear quarter/dogleg

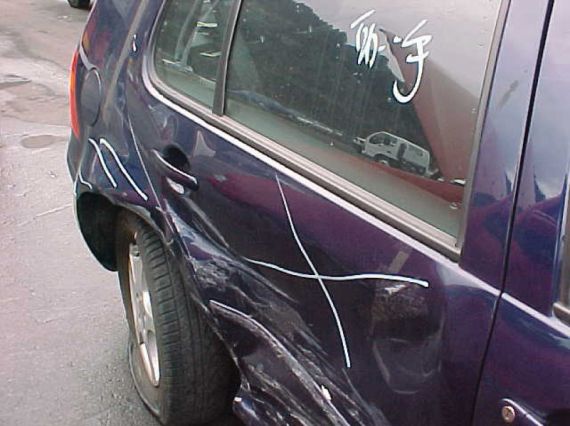
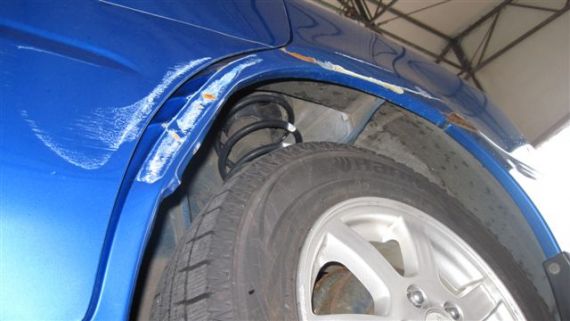
5-6 Dogleg flag
Look for discrepancies in the door gap.


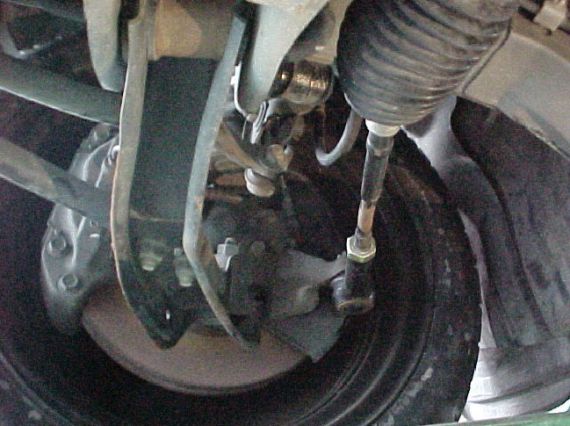
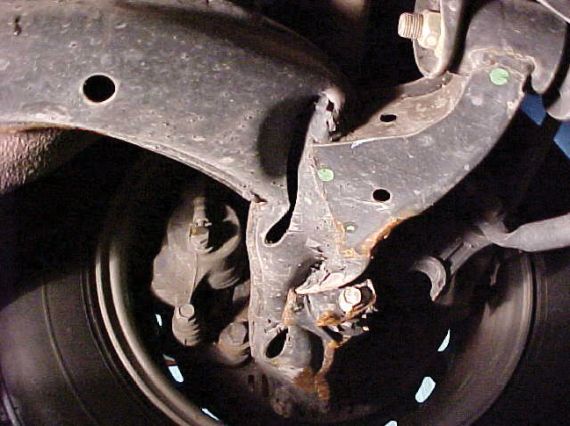
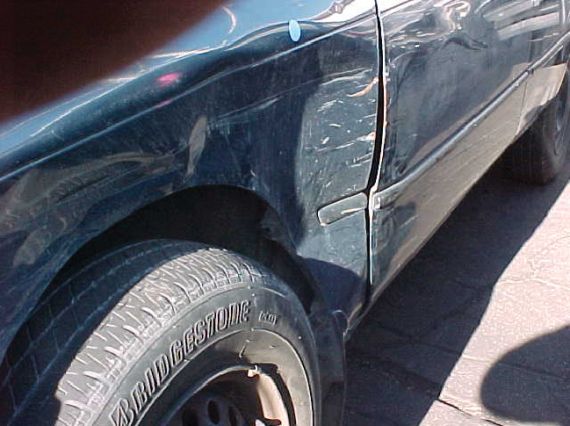
5-7 Distortion to longitudinal rails: Front and rear crush zones
5-8 Collision damage to steering or suspension components


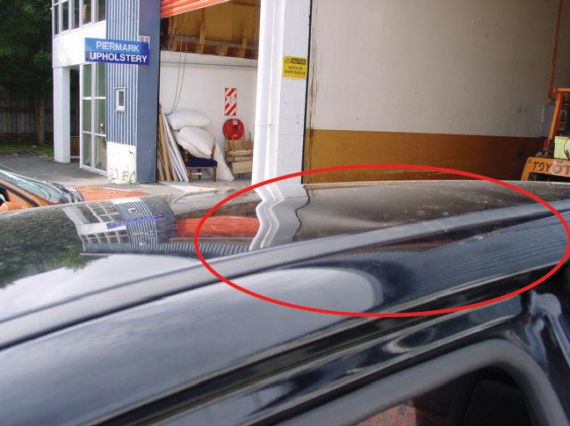
5-9 Damage to the vehicle’s outer body panels: Seam or joint integrity
Damage to the vehicle’s outer body panels which affect the integrity of any of the seams or joints installed by the vehicle manufacturer (and may have also caused secondary damage - further inspection may be required)
5-10 Corrosion which has resulted in perforation or flaking of the metal: Nissan Terrano and Mistral
When inspecting Nissan Terranos or Mistrals always check for corrosion of the floor under the rear seat (examples are shown in the first three photos below).


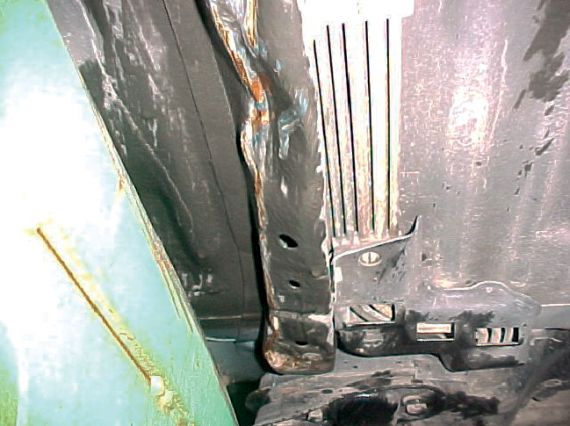
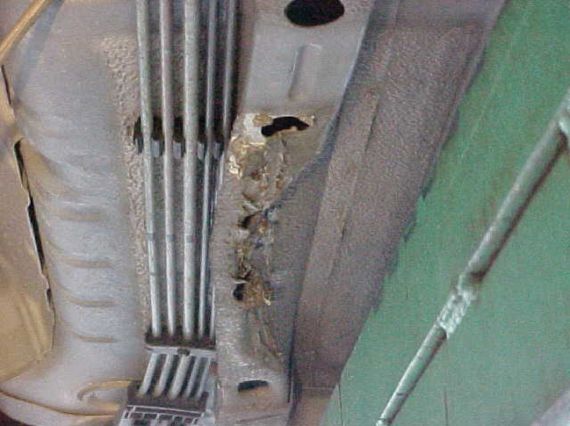
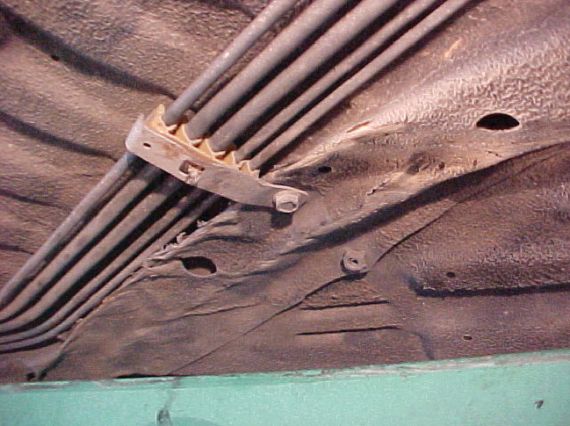
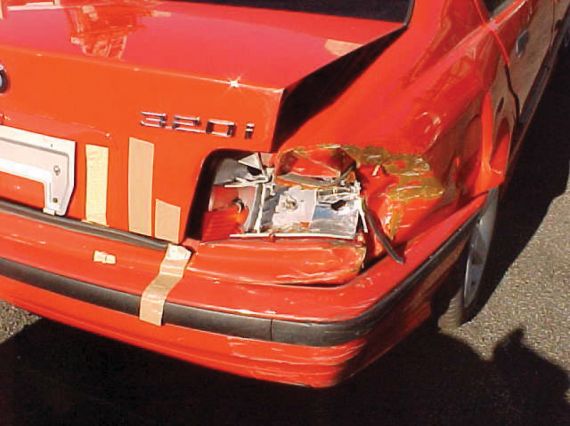
5-11 Water damaged vehicles
5-12 Heat and fire damaged vehicles
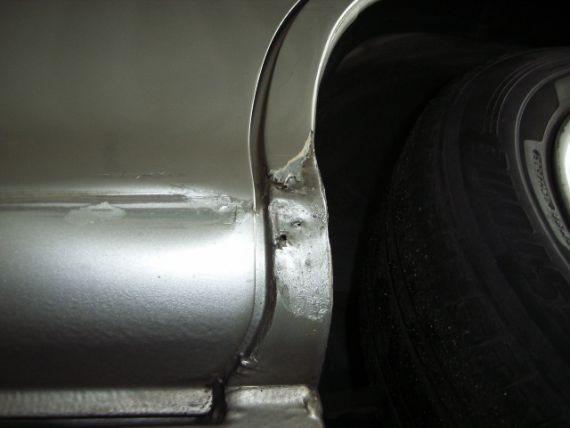
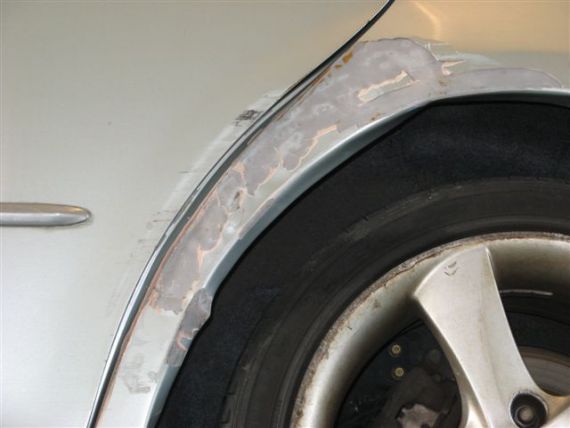
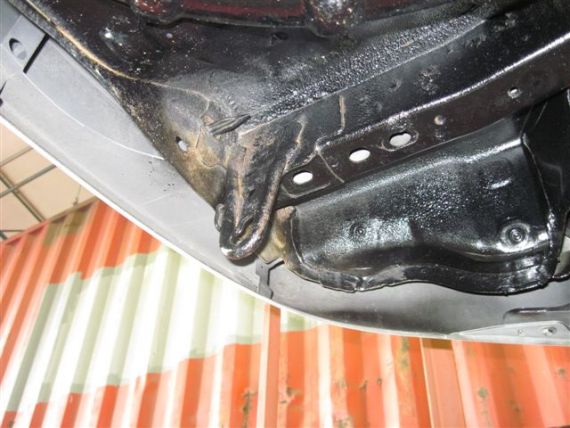
5-13 Examples of repairs


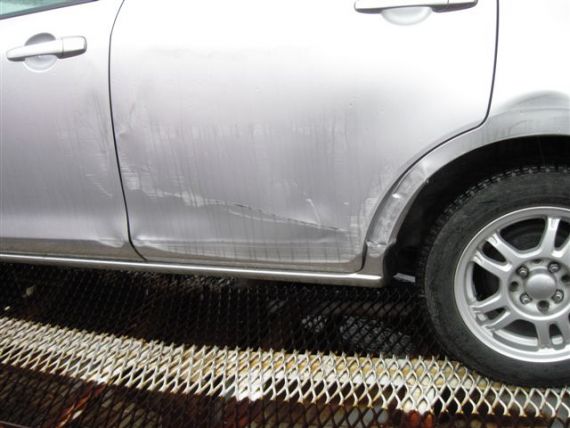
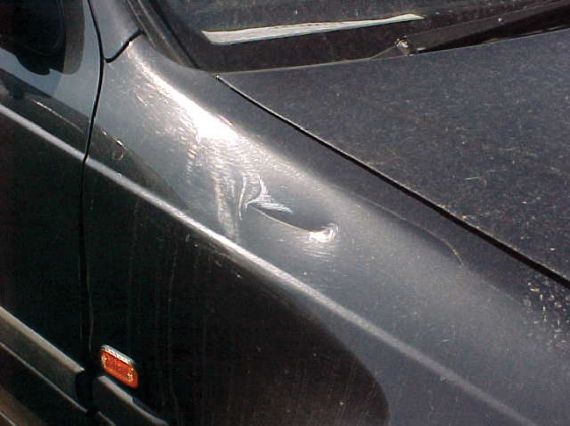
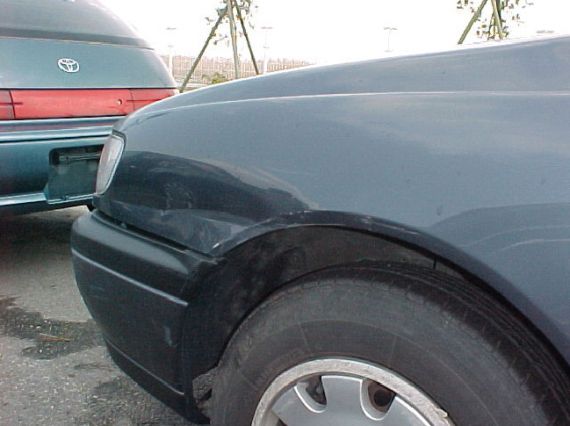
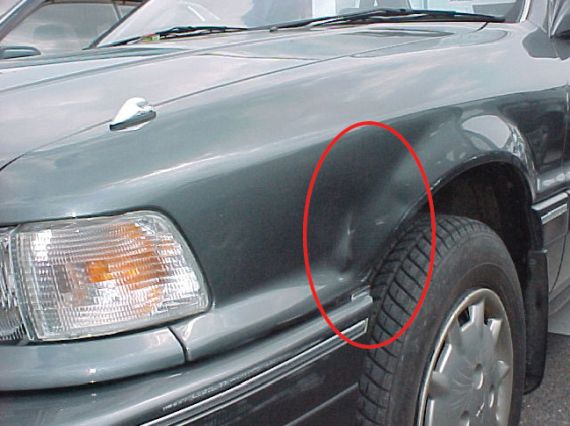
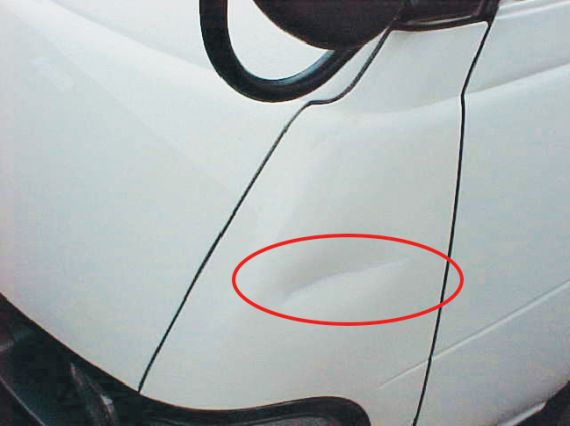
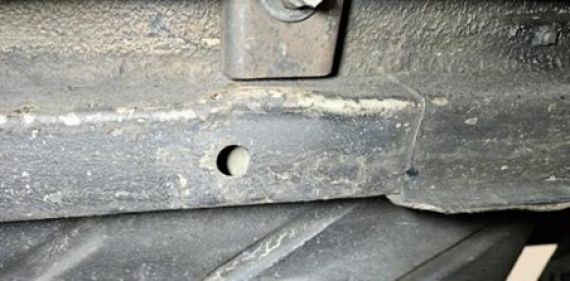
6 Examples of minor non-structural cosmetic damage
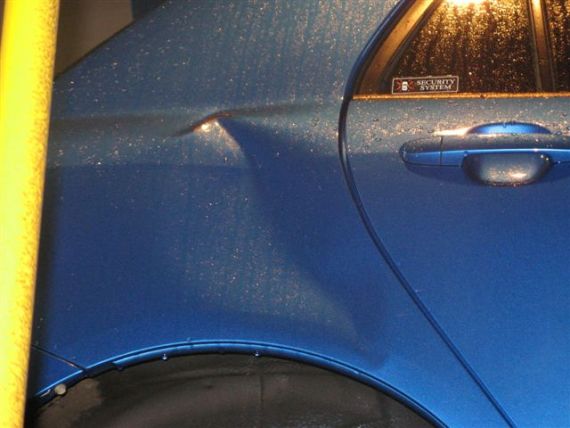
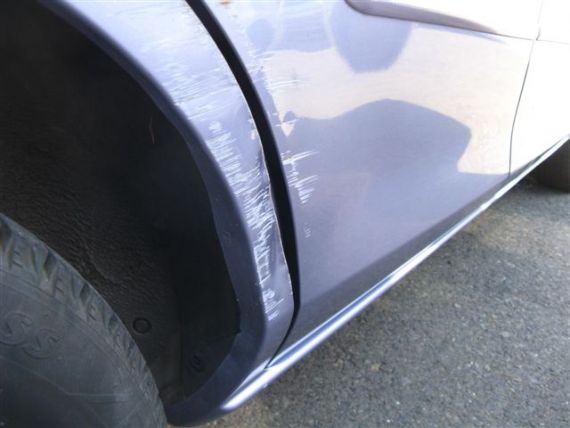
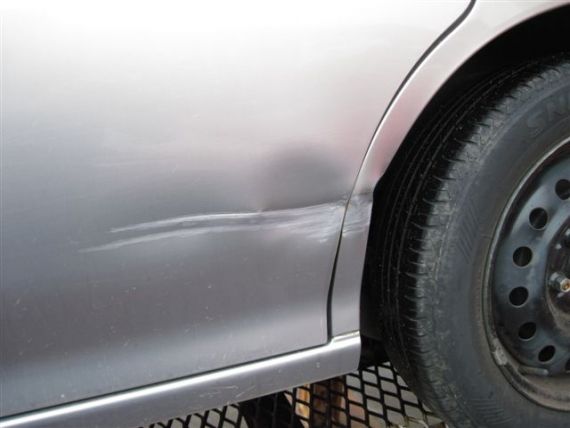
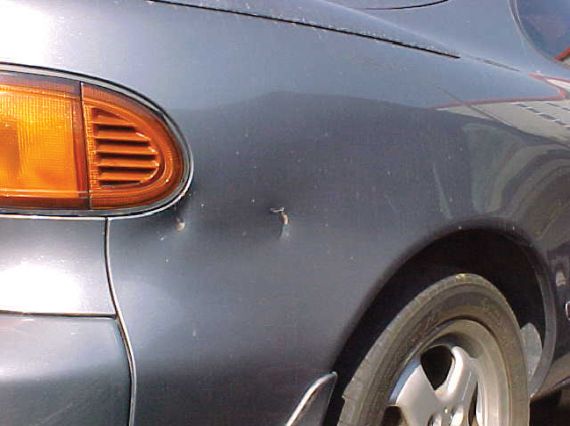
6-1 Front guards

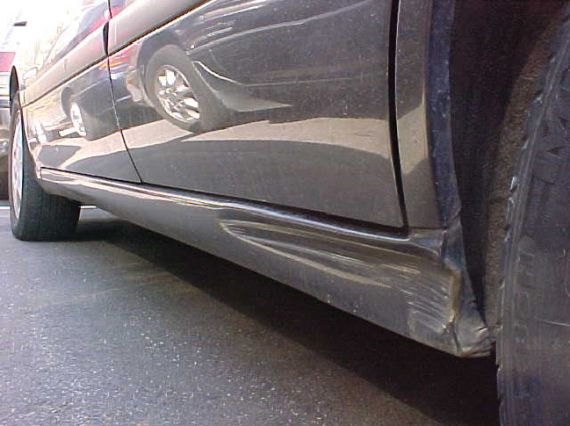
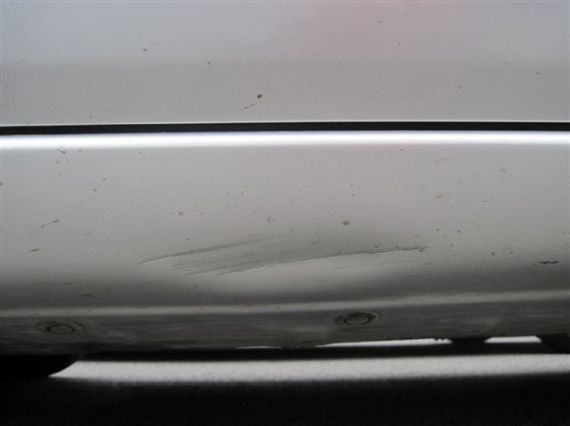
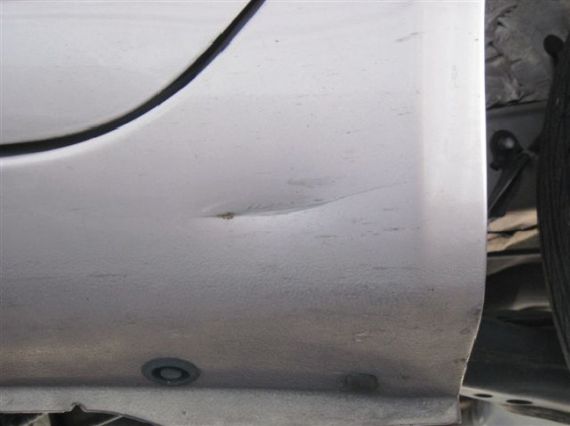
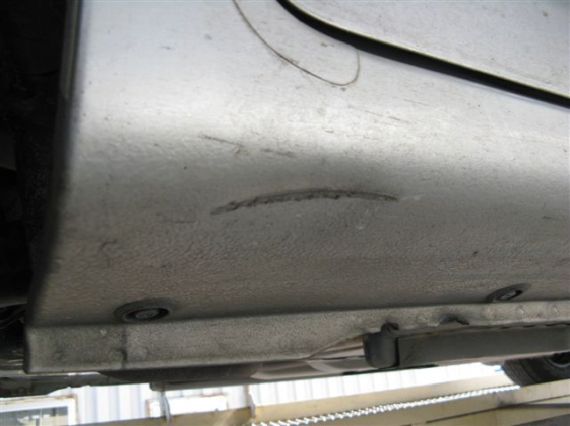
6-2 Sills/rocker panels (minor damage)
6-3 Minor/cosmetic damage: Rear quarter panel and dogleg

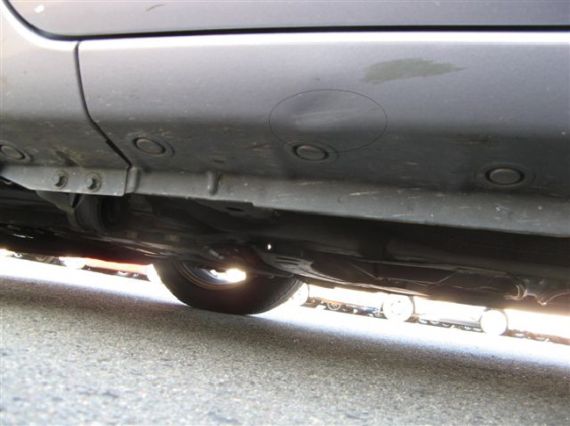
6-4 Minor/cosmetic damage: Floor pan stiffening members
The minor/cosmetic damage in these images doesn't need to be referred to a repair certifier.

Page added 21 February 2024 (see amendment details)
7a Checksheet specifications (vehicles inspected in NZ)
Overview
The Transport Agency preference is to have one standard checksheet that is used by all border inspection service providers.
General requirements applicable to all checksheets
- The checksheet must contain an ‘Appointed by Waka Kotahi NZ Transport Agency’ logo. Please email channels@nzta.govt.nz for requirements for the use of the logo.
- The checksheet must contain the version number and/or version date of the checksheet (eg 5/09, indicating that the checksheet was last approved/changed in May 2009).
- The checksheet must include the following information:
- The words: ‘Complaints regarding border inspection issues should be first directed to the border inspection organisation’. Additional words may be added to the checksheet to meet the requirements for complaint statements contained in the Introduction section of the VIRM.
- The words ‘NZ Transport Agency reserves the right to recheck any vehicle following an inspection.’
Items to be on the checksheet
- The checksheet shall contain all the items to be recorded and checked by the vehicle inspector during a border inspection.
- Any additional items included must be relevant to the inspection requirements in the VIRM.
Items required to be recorded on all checksheets
- Inspecting Organisation name
- Address where inspection was carried out
- Vehicle Make
- Vehicle Model
- Vessel Name
- Voyage number (optional)
- Vehicle Identification Number (VIN)
- Inspection date
- Vehicle Inspector’s name
- Vehicle Inspector’s signature
- Indication of vehicle structural inspection pass or fail
- Diagram of vehicle/s
- For damaged vehicles a check list (see below) detailing type of damage and where damage is located on the vehicle
- Damage
- Rust
- External
- Under body
- Internal
- Front
- Rear
- Side
- Left
- Right
- Odometer reading
- Left-hand-drive/right-hand-drive
- Provision for notes to be recorded.
7b Checksheet specifications (vehicles inspected outside NZ)
Overview
The NZTA preference is to have one standard checksheet that is used by all border inspection service providers.
General requirements applicable to all checksheets
- The checksheet must contain an ‘Appointed by NZ Transport Agency’ logo. Please refer to the latest version of the NZ Transport Agency Visual identity guidelines via this link for requirements for the use of the logo.
- The checksheet must contain the version number and/or version date of the checksheet (eg 5/09, indicating that the checksheet was last approved/changed in May 2009).
- The checksheet must include the following information:
- The words: ‘Complaints regarding border inspection issues should be first directed to the border inspection organisation’. Additional words may be added to the checksheet to meet the requirements for complaint statements contained in the Introduction section of the VIRM.
- The words ‘NZ Transport Agency reserves the right to recheck any vehicle following an inspection.’
Items to be on the checksheet
- The checksheet shall contain all the items to be recorded and checked by the vehicle inspector during a border inspection.
- Any additional items included must be relevant to the inspection requirements in the VIRM.
Items required to be recorded on all checksheets
- Inspecting Organisation name
- Address where inspection was carried out
- Vehicle Make
- Vehicle Model
- Vehicle Identification Number (VIN)
- Inspection date
- Vehicle Inspector’s name
- Vehicle Inspector’s signature
- Indication of vehicle structural inspection pass or fail
- Diagram of vehicle/s
- For damaged vehicles a check list (see below) detailing type of damage and where damage is located on the vehicle
- Damage
- Rust
- External
- Under body
- Internal
- Front
- Rear
- Side
- Left
- Right
- Odometer reading
- Left-hand-drive/right-hand-drive
- Provision for notes to be recorded.
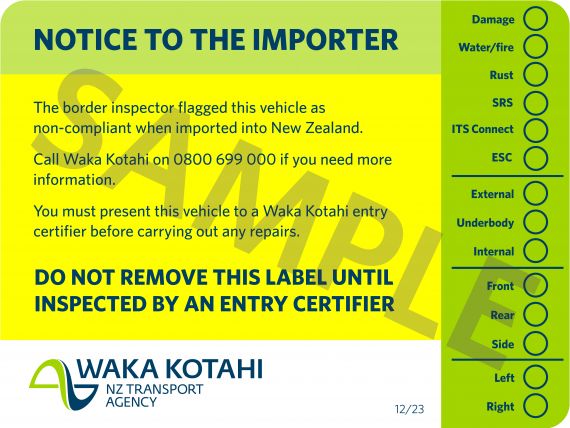
8 The border inspected sticker
Shown below is an example of the 'border inspected' sticker.
- Note that logos of the border inspection organisation will be in the top or bottom right corner.

Sticker image updated 1 June 2022.
9 Procedure for inspecting vehicles ... without having the NZTA border inspection
Procedure for inspecting vehicles that have been released from a Customs controlled area (CCA) or MPI transitional facility (TF) without having the Waka Kotahi border inspection
Before carrying out the Waka Kotahi border inspection the following procedures must be followed:
Verify the date when the vehicle arrived in New Zealand by sighting either a Customs clearance document or a MPI bio-security clearance certificate.
Inspect the vehicle to verify that the vehicle identification number (VIN) is the original identifier that was fitted by the vehicle manufacturer.
Carry out the Waka Kotahi border inspection and data transfer process.
Collect the Waka Kotahi border inspection fee as part of the cost of inspection.
10 Inspection of motorcycles
Vehicles imported from Australia Every vehicle imported from Australia will need to have a Personal Property Securities Register (PPSR) certificate downloaded from https://transact.ppsr.gov.au/ppsr/SearchForMotorVehicle?v=Search If the certificate identifies the vehicle as 'written off' it must be reported as damaged and a copy of the PPSR certificate uploaded into the Border Inspection system. |
When inspecting motorbikes the areas to inspect are:
The front forks, and their operation
- This is done by pushing down on the front forks of the bike and watching the fork operation
- Make sure the operation is smooth
- Make sure there is no binding felt when doing this.
Steering head area for misalignment
- Carry out a good inspection of this area, making sure the head angle is per factory and not bent, pushed back or fractured.
The motorbike frame
- Look for previous repairs as well as existing damage
- This is carried out by a good general inspection of the frame and factory welded joins and seams. You’re looking for stress markings in the weld or seam areas and or signs of previous repairs such as file marks miss matched paint or existing damage.
Figure 10-1-1. VIN number location
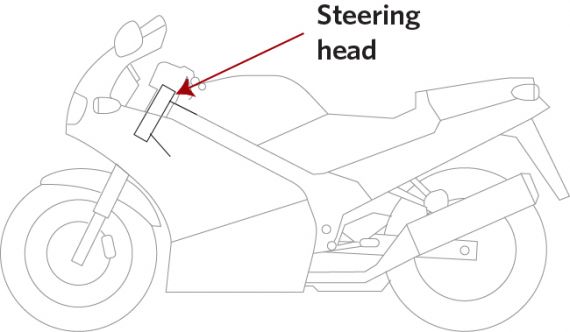
VIN number is found on the steering head, stamped into the metal.
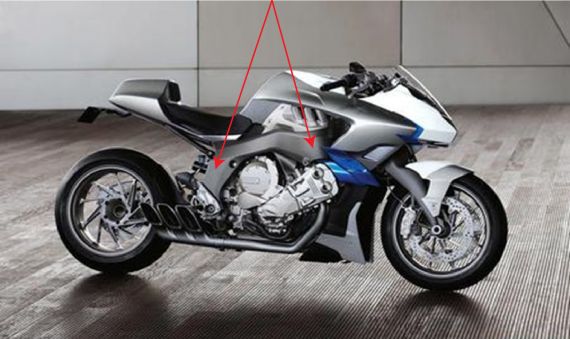
Figure 10-1-2. Plastic flarings
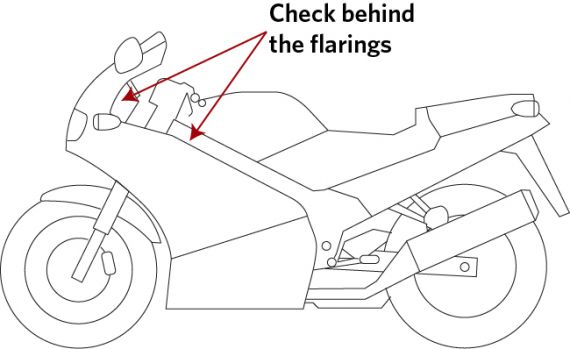
Modern motorbikes have a lot of plastic flarings covering the frame.
It is important that the inspector check behind these flaring’s for damage.
Figure 10-1-3. Stripped down bike frame
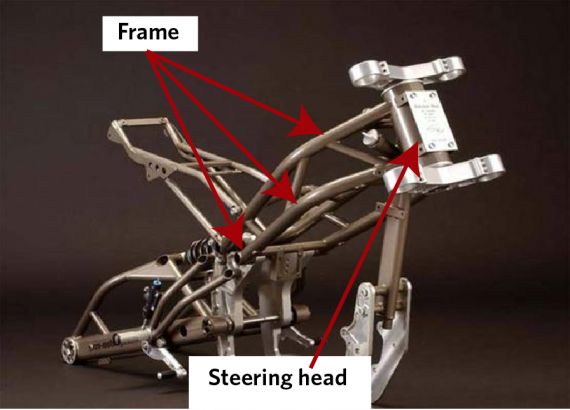
Figure 10-1-4. Check the frame
Check frame for damage
Page amended 29 March 2023 (see amendment details)