Correct as at 20th April 2024. It may be superseded at any time.
Extract taken: from Vehicle Inspection Portal > VIRMs > Border inspection of imported used vehicles > Reference materials > Border inspection system guidelines
2 Border inspection system guidelines
2-1 System guidelines overview
Border inspection system
The purpose of the border inspection system is to record the data collected by service providers when border inspections are performed on used vehicles intended to be imported into New Zealand.
Entering border inspection records
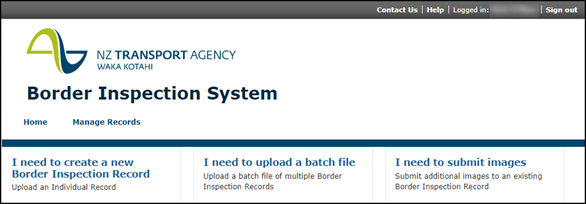
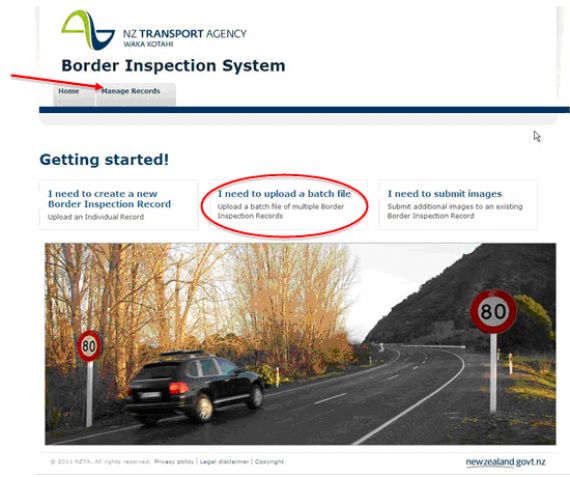
Border inspection records can be entered individually through a user interface, or stored in a batch file and uploaded to the system via the border inspection system homepage.
A border inspection record must be entered within 48 hours of the inspection being carried out for vehicles inspected in New Zealand and within five days after the ship has departed for vehicles inspected offshore.
Access to methods of entering records
Access to both methods of entering a record is via the homepage of the border inspection system website.
Duplicate records will not be accepted.
Note: To increase the font size in the system, select and hold Control (Ctrl) whilst simultaneously rolling the scroll wheel on your mouse.
Logging into the system
Refer to the Accessing and logging into the system section for instructions on how to access the NZTA online services and log in to the border inspection system.
Border inspection system homepage

Attachments
Border inspection records may include attachments; attachments may be a combination of images and one water damage report. Refer to the Attachments section for further information about attachments and their specifications.
Contact details
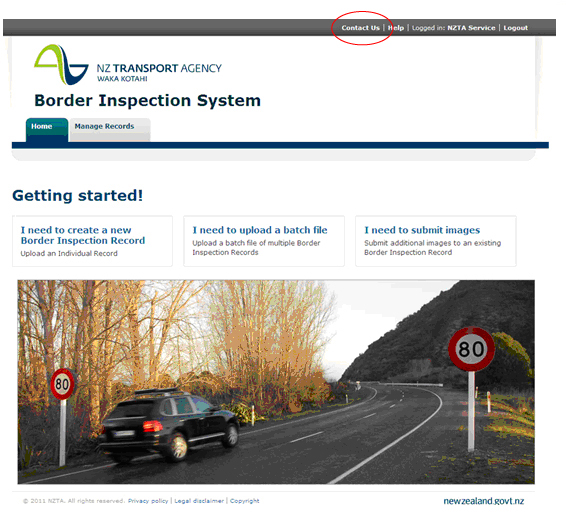
To access NZTA contact details, hover your mouse over Contact Us at the top right-hand side of the screen. The message will refer you to the VIRM, page 2-1 for the relevant NZTA contact details.
2-2 Accessing and logging into the system
Logging into the border inspection system
| Step | Action |
|---|---|
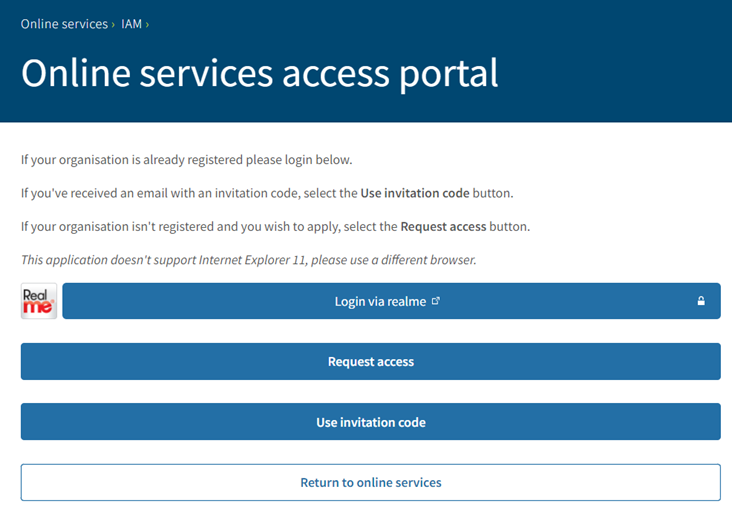
| 1 | Open a new browser window and enter the following URL: https://accessportal.nzta.govt.nz/ Please note: the portal does not support Internet Explorer, please use a different browser, |
| 2 | This will provide access to the Waka Kotahi online services access point:
|
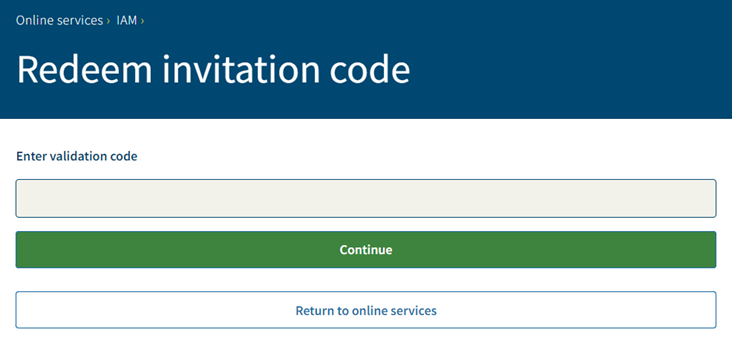
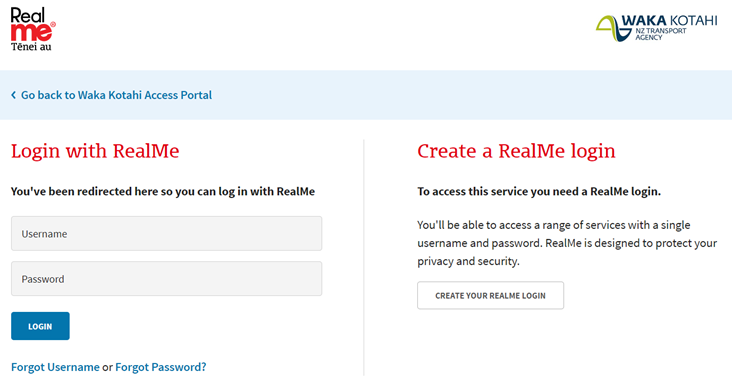
| 3a | To access the system for the first time you must accept an invitation. Select the Use invitation code button. This will take you to the Redeem invitation code screen. Enter invitation code and select Continue.
You will be directed to the Realme login page – go to step 4. Note: You only need to accept an invitation once, to register to the portal. For all subsequent logins go to step 3b. |
| 3b | To login, select Login via realme. |
| 4 | You will be directed to the Realme login page. Enter your realme login.
|
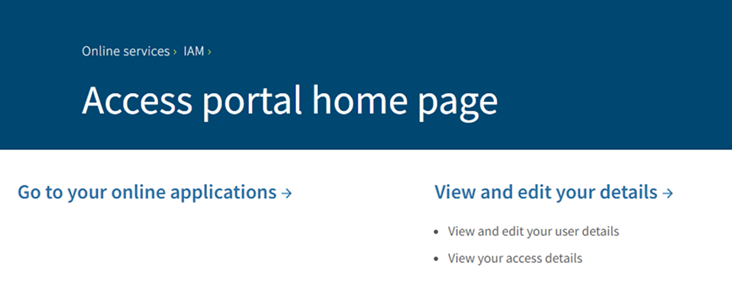
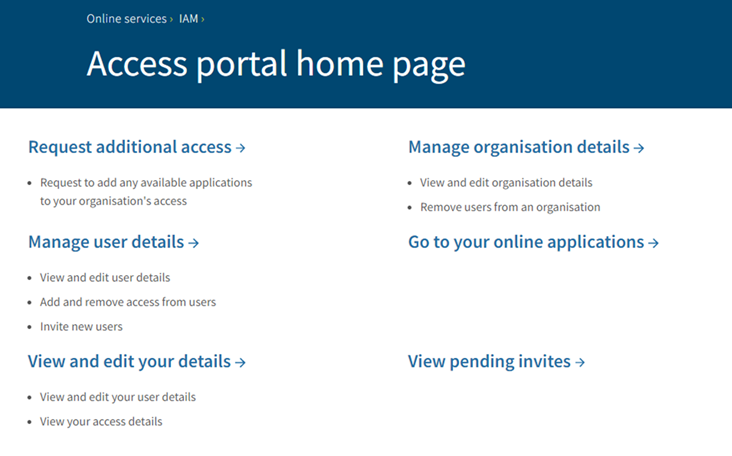
| 5 | Successful login will direct you to the Access portal home page. Your home page will be either the General user home page or the Organisation administrator home page. General user home page
Organisation administrator home page
|
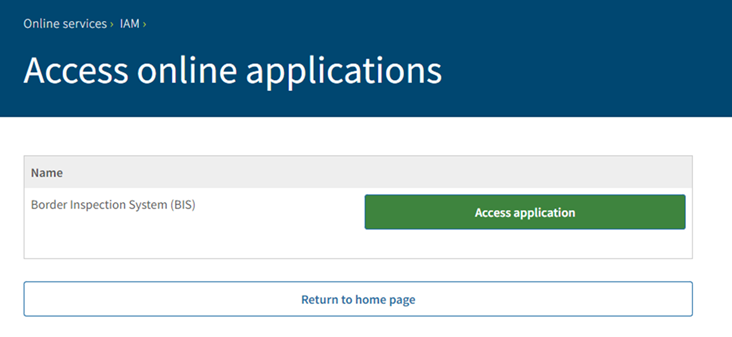
| 6 | Select Go to your online applications. |
| 7 | This will take you to the Access online applications screen.
Select the green Access application button next to Border inspection system (BIS). |
| 8 | You will be directed to the Border inspection system home page.
|
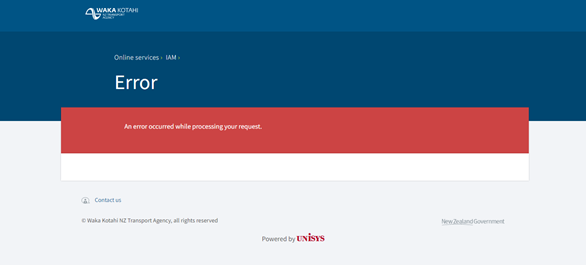
| 9 | Unsuccessful login screen.
|
Page amended 8 November 2022 (see amendment details)
2-3 Border Inspection System administration and corrections information
The following information is to assist Border Inspection Organisations (BIOs) new to the Border Inspection System (BIS). It provides quick administrative answers to some frequently asked questions.
BIS system
A batch file is accepted into BIS excluding any errored records. Errored record should be corrected and sent in a new batch file.
- The same batch file will not be accepted twice, and the system does not accept duplicate records.
Occasionally you may have a second border inspection for the same vehicle or another vehicle using the same chassis number. For authority to load the record using an alternative chassis field, email borderchecks@nzta.govt.nz providing the error message and the border inspection details for review. An alternative solution may be provided.
If copying and pasting data into a record, please ensure low value characters (usually @ * ^ ~) are not included.
There are two uploads from BIS to LANDATA each day.
- Records received prior to 1:00am (NZ time) are uploaded to LANDATA at 6:00am (NZ time).
- Records received prior to 1:00pm (NZ time) are uploaded to LANDATA at 2:00pm (NZ time).
Photos
Four photos can be loaded with the border inspection record. An additional four can be added to an existing record. If there are photos, keep them with your records as we can ask if they’re needed.
For more information see 2-8 Adding additional images to an existing record
Updated NZTABusinessDataTypes.xsd files are emailed when the Motor Vehicle Register (MVR)/LANDATA system tables have been updated. These files are provided to ensure that the information you load will be accepted into BIS and will also load into LANDATA. For example, a border inspection record loaded into BIS using an invalid make will load into BIS but not LANDATA. For example, Mercedes-Benz is correct but M/Benz and Mercedes Benz are invalid.
Included in the file are:
- ISO list of three-character country codes
- list of Ports
- list of border inspection sites
- makes
Correcting errors to border inspection records
Inspection dates, importer names, ship names, or port of arrival
Send a copy of the border inspection checksheet to borderchecks@nzta.govt.nz and we will update the LANDATA record.
VIN/chassis number recorded incorrectly
Advise the incorrect number to your customer.
Your customer (or the importer/owner) should provide the incorrect VIN or chassis number to a New Zealand entry certification agent. The entry certifier will verify the correct VIN or chassis number physically on the vehicle. If it’s a chassis number, the agent can correct it. If it’s a factory VIN and both the incorrect and correct VINs are valid in LANDATA the entry certification agent will contact Waka Kotahi NZ to fix.
Make and/or Model
This will be corrected by the entry certifier. They will inspect the vehicle and ensure the vehicle attributes that have been loaded into LANDATA are correct.
Damage flag set in error
Send an explanation to borderchecks@nzta.govt.nz and if appropriate we will remove the damage flag in LANDATA.
Damage flag not set
Send the damage notes and photos to borderchecks@nzta.govt.nz. The damage flag and damage note will be added to the LANDATA record. The photos (up to eight) will be added to the BIS record. If there are numerous records requiring correction, an alternate process may be given.
Incorrect Odometer reading
Email a photo of the odometer reading taken during border inspection and/or a copy of any paper-based documentation that shows the actual odometer reading recorded by the inspector to borderchecks@nzta.govt.nz
If your documentation shows the recorded odometer reading and the customer (or the importer/owner) believes the odometer reading it’s incorrect, they or their NZ entry certification agent should email the following to frr@nzta.govt.nz for consideration:
- A copy of the entry certification checksheet, and
- Other official inspection documents (shipping and auction/sales documents are not appropriate) showing the odometer reading in the previous country of registration, or
- Documentation from a recognised NZ odometer specialist certifying that the odometer has not been tampered with and it’s considered to correctly record the distance the vehicle has travelled at the time of inspection.
Where keying error can't be identified
Where a keying error cannot be verified, the public display of odometer records can be suppressed. This is discretionary and based on risk and supporting documentation. If the information provided is not deemed sufficient, we will not change the odometer reading leaving it publicly available to allow the public to come to their own decision as to the vehicle's correct mileage.
Any other questions concerning the Border Inspection System (BIS) and the Motor Vehicle Register System (LANDATA), please email borderchecks@nzta.govt.nz
Page added 1 October 2022 (see amendment details)
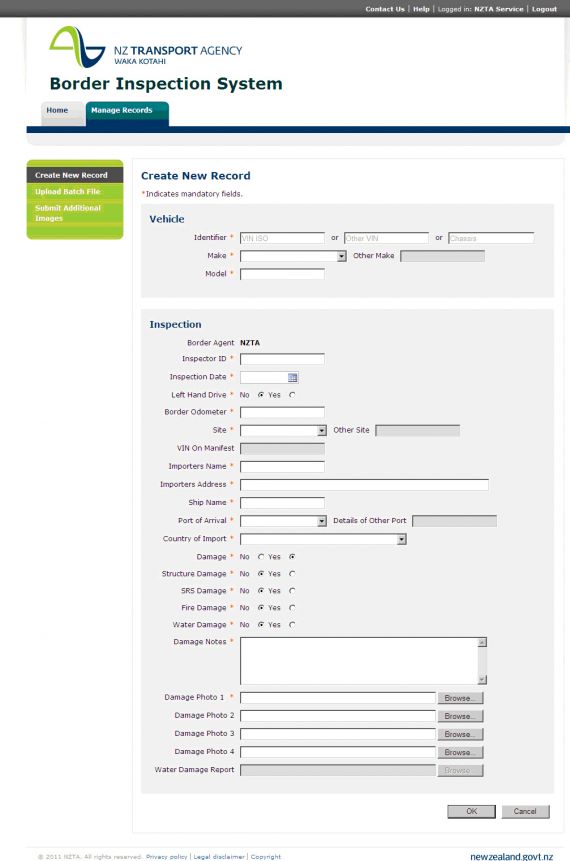
2-4 Entering an individual record
Creating a new record
| Step | Action |
|---|---|
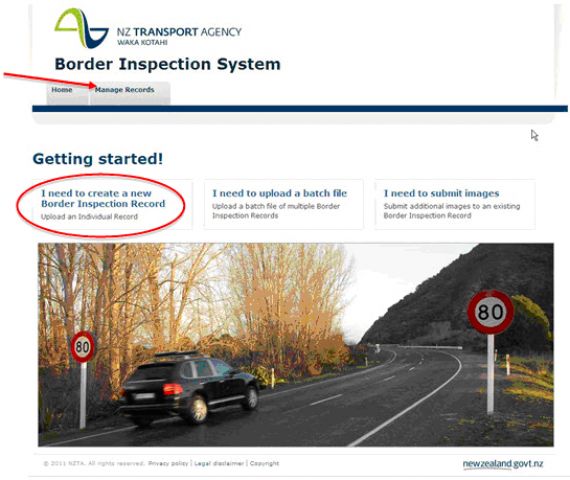
| 1 | On the homepage, create a new record by using one of the methods below:
|
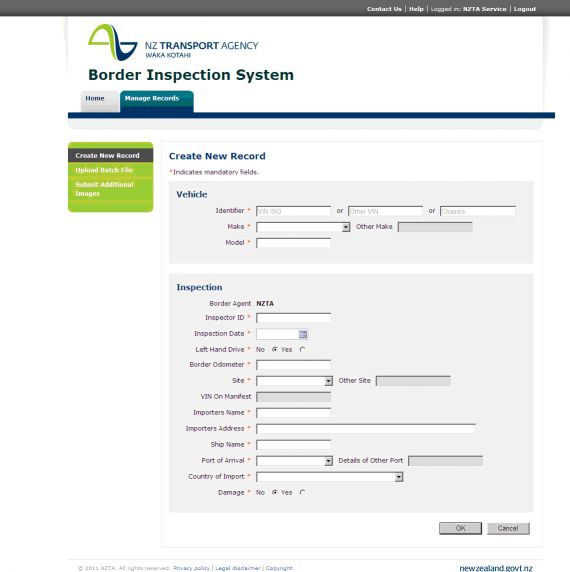
| 2 | A new window will open and display the following form:
|
| 3 | Complete the necessary fields. Note: Refer to the Completing the form section for additional information about entering details. |
| 4 | When all fields have been completed and all attachments (if necessary) have been added, to save the record, click on OK. |
2-5 Completing the form
Standard mandatory fields
In the Create New Record screen, any field that is preceded by an * is a mandatory field and must be populated before the record is submitted.
The following fields are mandatory:
- Identifier
- Make: select from a drop-down list
- Model: free text
- Inspector ID: free text
- Inspection Date: select using the calendar picker
- Left Hand Drive: automatically defaults to ‘No’
- Border Odometer: must contain a value greater than, or equal to, zero
- Site: select from a drop-down list
- Importers Name: free text
- Importers Address: free text
- Ship Name: free text
- Port of Arrival: select from a drop-down list
- Country of Import: select from a drop-down list
- Damage: automatically defaults to ‘No’.
Additional notes for vehicle section
- Identifier: at least one identifier must be entered for a record. Either:
- VIN ISO, or
- Other VIN
Do not enter a vehicle identifier into the ‘Chassis’ field.
- Make: if you select Other in the Make drop-down list, enter the make details for the record in the Other Make box.
Note 1
VIN ISO:
- cannot include: ‘O’ for Oscar, ‘I’ for India or ‘Q’ for Quebec
- must be 17 characters in length
- must not have a dash (-) entered in the number.
Note 2
A Japanese domestic VIN will always have a dash (-) somewhere in the VIN.
Additional notes for inspection section
- Inspector ID: Use the person’s initials followed by a sequential number which identifies the inspector.
- Inspection date: the inspection date must be entered as yyyy/mm/dd. Select a date by using the date picker icon to the right of the Inspection Date box.
Note: The date cannot be in the future. - Border Odometer: border odometer readings must be values that are equal to or greater than zero. If no odometer reading can be recorded, enter ‘00000’
- Site: if you select Other in the Site drop-down list, enter the site details for the record in the Other Site box.
- Ship name: If you want to record the voyage number, use this field following the name of the ship, eg Transfuture 6 (VOY 48)
- Port of Arrival: if you select Other in the Port of Arrival drop-down list, enter the port details for the record in the Details of Other Port box.
- Country of import: this is the country that the vehicle was exported from.
- Damage: if the No button is selected, the Damage section will not appear and no further fields need to be completed. If the Yes button is selected, further fields related to damage will appear enabling notes, photos and/or water damage reports to be attached to the record. Refer to the Entering further information if the vehicle is damaged section for further details.
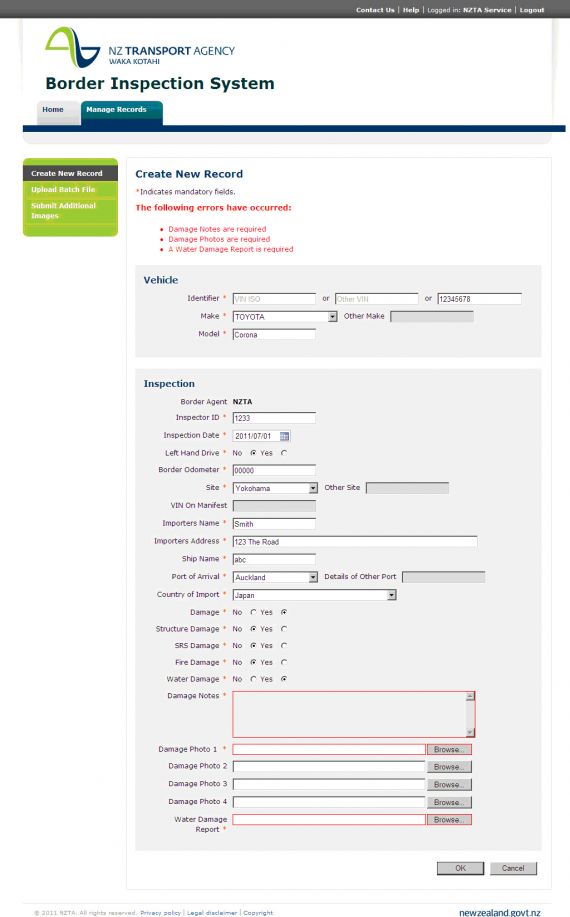
2-6 Entering further information if the vehicle is damaged
Create new record screen with additional damage fields
Mandatory fields for damage information
If the vehicle has been damaged, the following fields are mandatory:
- Damage
- Structure Damage
- SRS Damage
- Fire Damage
- Water Damage
- Damage Notes
- Damage Photo 1.
Additional notes for the damage fields
- Damage: if you select the Yes button, you must supply at least one photo with the record showing the damage to the vehicle. Refer to Damage Photo 1 bullet point below.
- Damage notes: when entering damage notes, select from the following list to describe the type of damage and where the damage is on the vehicle.
Damage Rust |
External Underbody Internal |
Front Rear Side |
Left Right |
Note: When a modified vehicle is flagged, record in the notes "suspect modification to the vehicle".
- Water Damage: if you select the Yes button, you must supply a water damage report with the record. Refer to Water Damage Report bullet point below.
- Damage Photo 1: click on Browse… to locate the photos to be attached.
Note: Photo pixels must not exceed 640 x 480 pixels. Minimum of two photos must be attached.
- Water Damage Report: click on Browse… to locate the file to be attached
- Refer to the Attachmentssection for detailed specifications for photographs and reports.
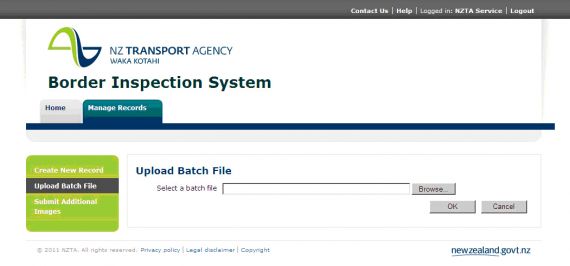
2-7 Entering multiple border inspection records (batch files)
Introduction
Multiple border inspection records can be loaded in an .xml file and submitted for upload to the border inspection system.
Uploading a batch file
| Step | Action |
|---|---|
| 1 | On the homepage, upload a batch file by using one of the methods below:
|
| 2 | A new window will open requesting that you select a file to upload:
|
| 3 | Click on Browse… to locate the batch file stored on your system. |
| 4 | After you have selected the relevant file, click on OK. |
Batch file specifications
- The file must be supplied in an xml format that meets the NZ Transport Agency (NZTA) border inspection schema. For a copy of the schema, refer to the technical specifications that were supplied with your NZTA contract.
- Images and jpegs are to be incorporated as part of the inspection record and included in the xml file
- The following fields must be populated in upper case:
» UnknownMake (eg KAMAKUSA)
» ImporterName (eg FAST CARS INC)
- The following fields must be populated in title case:
» UnknownPort (eg Whanganui, not whanganui or WHANGANUI)
» UnknownSite (eg Pokeno, not pokeno or POKENO).
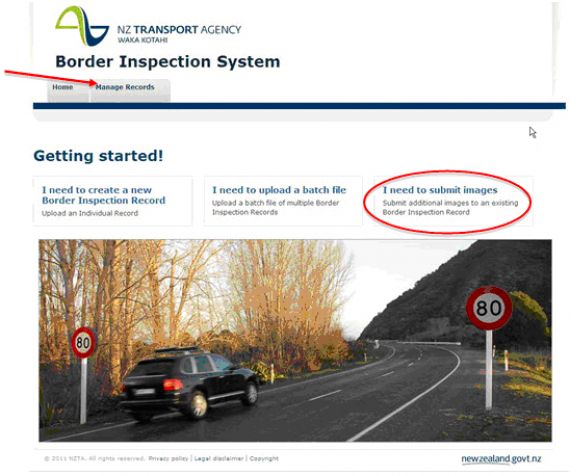
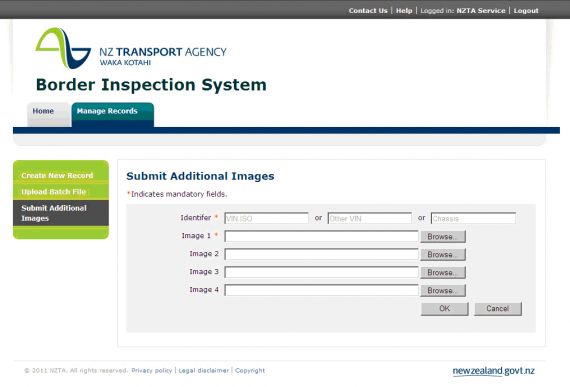
2-8 Adding additional images to an existing record
7 Adding additional images to an existing record
Overview
- An additional four images may be added to an existing border inspection record
- Additional images must be located, selected and then submitted for inclusion with an existing inspection record
- Additional images can only be uploaded to one inspection record at a time.
Adding additional images
| Step | Action |
|---|---|
| 1 | On the homepage, add additional images by using one of the methods below:
|
| 2 | A new window will open that provides browser capability to enable additional images to be selected:
|
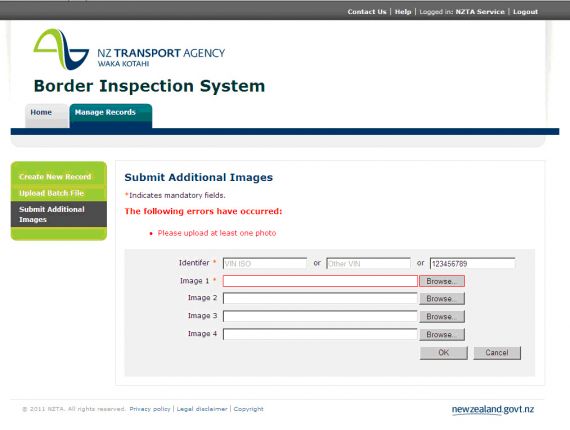
| 3 | Enter the Identifier associated to the existing inspection record that you wish to add the images to. This will be either:
Note: VIN ISO cannot include: ‘O’ for Oscar, ‘I’ for India or ‘Q’ for Quebec, and must be 17 characters in length. |
| 4 | Next to Image 1, click on Browse… to locate the image to be uploaded. Refer to the Attachments section for attachment specifications. |
| 5 | Once selected, the name of the image for uploading will be displayed in the Image 1 box. |
| 6 | Use the Image 2, 3 and 4 boxes to upload more images, if necessary, clicking on Browse… beside each box to locate the images to be uploaded. |
| 7 | After you have uploaded all necessary images, click on OK. |
2-9 Attachments
8 Attachments
Water damage report
When a record indicates that the vehicle has water damage, a water damage report must be included. This is stored as a jpeg file and submitted with the initial record:
- only one water damage report is permitted for inclusion with a record
- a water damage report cannot be submitted as an additional attachment after the initial record has been entered into the system.
See Reference material 4 for a copy of the water damage report form.
Technical specifications – water damage report
A water damage report jpeg must be a minimum size of 200kb and cannot exceed 400kb.
Photos
When a record indicates that the vehicle has damage, it must have at least one photo attached when the initial record is submitted:
- up to four images can be loaded with the initial record and another four images can be loaded separately for the record after the initial submission.
Technical specifications – photos
All photos supplied with records must meet the following specifications. Each image must:
- be formatted as a JPEG
- 640 x 480 pixels in size
- RGB, 24 bits per pixel
- Minimum DPI of 72, maximum of 180.
2-10 Example error messages (screenshots)
9 Example error messages (screenshots)
Error messages
When insufficient or incorrect information is entered by the user, an error message will display.
The message appears at the top of the page in red font and fields that require populating are also highlighted in red.
Example 1: Create new record
Example 2: Create new record
Example 3: Submit additional images