Correct as at 19th April 2024. It may be superseded at any time.
Extract taken: from Vehicle Inspection Portal > VIRMs > In-service certification (WoF and CoF) > Technical bulletins (general) > Quick noise check procedure
1 Quick noise check procedure
Reference
What is the purpose of the Noise Quick Check?
The purpose of this test procedure is to enable vehicle inspectors to carry out an exhaust noise check with an acceptable noise meter to ensure that vehicle exhaust systems that have been modified to be noisier than OE remain well below the maximum noise levels specified in law (ie be below the noise limits specified in the VIRM). Any vehicle that fails the Noise Quick Check needs to be made quieter and reinspected and/or referred to an LVV certifier for an Objective Noise Test (ONT).
This quick check test procedure is therefore a simplified version of the ONT to ensure results are comparable to the ONT.
What type of vehicle can be tested?
The quick check may be applied only to a vehicle of class LC, LD, LE, MA, MB, MC, MD1, MD2 or NA that is louder than when it was manufactured with its original exhaust system.
Test site specification
The test environment must be such that exhaust noise readings can be achieved as accurately as possible with as little interference from other noise sources as possible.
To achieve this, the test site must, within at least a 3m radius from the noise meter microphone:
1. be an open outdoor site (if this is not practicable, a canopied site may be used provided the canopy is at least 3m above the microphone)
2. be predominantly flat
3. be free from large sound-reflecting surfaces, including buildings, walls, billboards, vehicles, canopy/roof supports, trees or shrubs
4. have a solid surface, such as concrete or asphalt, that is free of any loose or sound-absorbing material.
It is important that a noisy background, eg due to road traffic or wind, is avoided. If in doubt, use the noise meter to measure the background noise either before or after the Noise Quick Check. The background noise must be at least 10dBA lower than the relevant exhaust noise limit specified in the VIRM. Sharp noise interference such as car doors slamming or loud footsteps must also be avoided to prevent false readings.
Which noise meters are acceptable for this test?
The noise meter must be of ‘Type 1’ or ‘Type 2’ (Class 1 or 2) standard to ensure accuracy. The noise meter specifications and a list of other equipment required for noise testing is available here.
The noise meter must be in good operating condition and be maintained within manufacturer’s specifications. Regular calibration is required. Make sure you know how to use it correctly by following the manufacturer’s instructions.
Note 1
The NZTA does not currently intend to make it mandatory for inspecting organisations to obtain a noise meter. However, if you are often presented with noisy vehicles, we strongly recommend that you have one available.
Vehicle preparation prior to testing
Before the noise test can be carried out, the vehicle must:
- have its engine at normal operating temperature
- be stationary with park the brake applied
- have the gear selector positioned in neutral (manual) or park (automatic)
- have the air-conditioning system turned off
- have the engine bonnet closed.
Setting up the microphone for testing
1. Ensure the microphone is fitted with the foam wind shield.
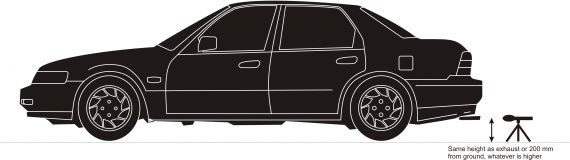
2. Height of microphone
- Mount the noise meter to the tripod. Place it on the ground with the centre of the microphone at about the same height as the centre of the exhaust outlet, but no lower than 200mm from the ground. Make sure the microphone is level, regardless of the angle of the exhaust outlet.
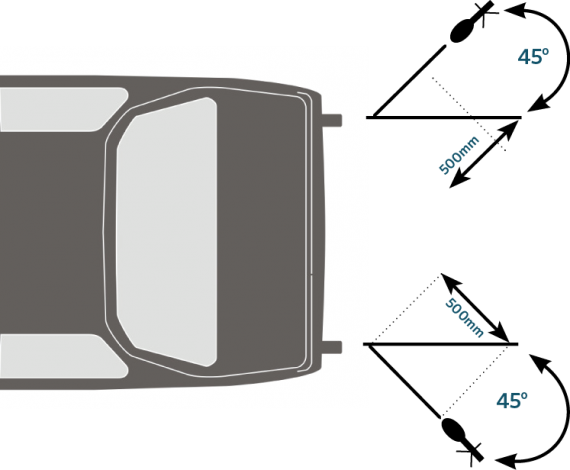
3. Distance of microphone from exhaust outlet
Distance of microphone from exhaust (outlet to the rear)
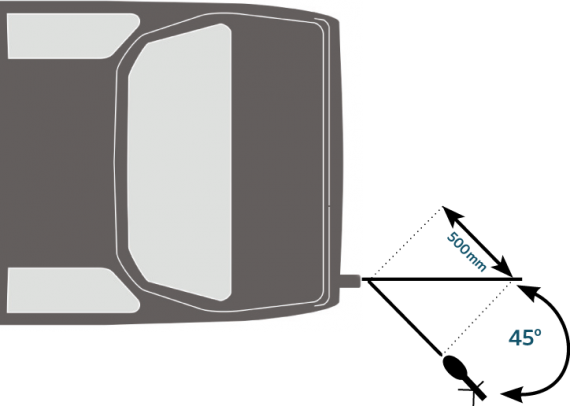
- Position the noise meter 500mm from the exhaust outlet at 45 degrees outboard to the longitudinal centreline of the exhaust outlet.
Distance of microphone from exhaust (outlet to the side)
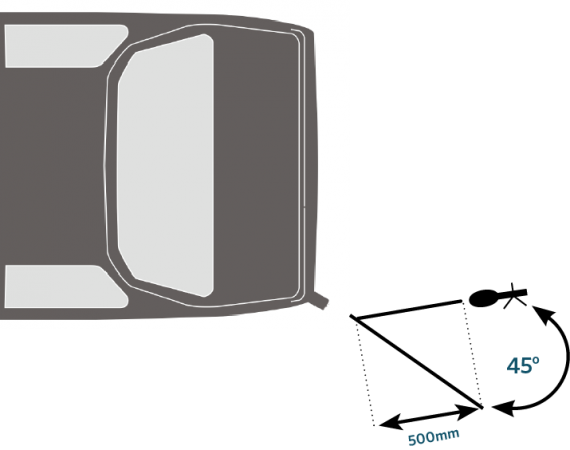
- If the exhaust outlet is at the side of the vehicle, position the noise meter 500mm/45 degrees where it is the furthest from the engine.
Distance of microphone from exhaust (outlet underneath vehicle)
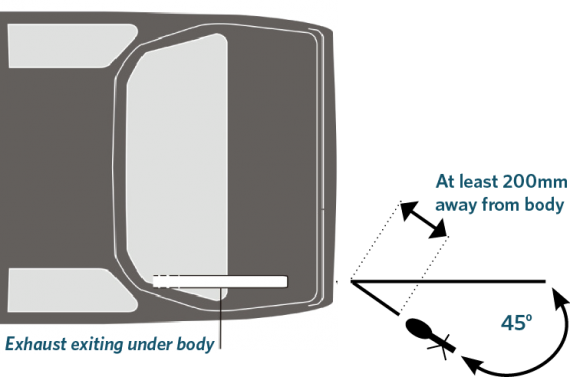
- For exhaust outlets terminating underneath the vehicle body, fit as close as practicable, but no closer than 200mm to the vehicle body. The 45 degree angle may be reduced to ensure a clear path between the microphone and the exhaust outlet.
Distance of microphone from exhaust (two outlets)
- If the vehicle has two exhaust outlets less than 300mm apart, treat them as one outlet with the microphone positioned at the outside outlet. If the two exhaust outlets are more than 300mm apart, measure each one, with the higher of the two taken as the noise level for the vehicle.
Select the test engine speed
Select the appropriate test engine speed from the table on the next page. Use the vehicle’s tachometer when doing the test (if no tachometer is fitted, use your judgement).
Motorcycle engines
Type of engine | Required test speed |
|---|---|
2-stroke single cylinder | 6000 rpm |
2-stroke multi-cylinder | 5000 rpm |
4-stroke single cylinder | 3000 rpm |
4-stroke twin-cylinder with 2 valves per cylinder | 2500 rpm |
4-stroke twin-cylinder with 3 or more valves per cylinder | 4000 rpm |
4-stroke with 3 or more cylinders | 4500 rpm |
Engines other than motorcycle engines
Type of engine | Required test speed |
|---|---|
Rotary engine | 4500 rpm |
Up to 5 cylinders | 4000 rpm |
Up to 5 cylinders with DOHC and variable valve timing | 4800 rpm |
6 cylinders | 3200 rpm |
8 cylinders | 3000 rpm |
More than 8 cylinders | 4000 rpm |
Diesel (any type) | 2500 rpm |
Testing the noise output
1. Make sure that you (the tester) and one assistant (if you require one) are the only persons in the test area.
2. Position and prepare the meter: switch on – warm-up – calibrate (Note)– set to A-weighting – set to fast response – select the correct noise level range (usually ‘High’) – press the Peak-hold or Max-hold button when ready to measure the noise output.
Note 2
To calibrate before testing the vehicle, insert the meter into the calibrator. If the reading on the noise meter differs from the calibrator there is no need to adjust the meter, but the difference needs to be taken into account when determining the final noise reading for the vehicle. For example, if the meter reads 2dBa higher than the calibrator, take off 2dBa from the noise test reading to get the final reading.
3. Measure the noise output by increasing the engine speed from idle to the required test speed, holding it there for at least one second, then taking the foot off the accelerator and letting the engine speed return to idle.
4. Make sure that no other noise sources have interfered with the test result, such as planes flying overhead, doors slamming (take care when getting in and out of the test vehicle), dogs barking and so on. Rattling number plates can also be a source of noise interference. If interference occurred, repeat the test (press the Max/hold button first).
5. The noise meter will show the maximum noise output. Record this reading on your checksheet.
6. Measure the background noise level (this can be done before or after the noise test). The microphone must be in the same position and the vehicle’s engine switched off. The background noise level must be at least 10dBA below the relevant exhaust noise limit as specified in the VIRM.
If you come across a vehicle you are not sure how to test, then refer it to an LVV certifier who is approved to carry out an Objective Noise Test.
Passing and failing the vehicle
PASS: The noise reading does not exceed the relevant maximum noise limit specified in the VIRM: In-service certification, Section 11-1 Exhaust system.
FAIL: The noise reading exceeds the relevant maximum noise limit in the VIRM. Give the operator the ‘Noisy Vehicles’ pamphlet.